O Universo não é uma idéia minha.
A minha idéia do Universo é que é uma idéia minha.
A noite não anoitece pelos meus olhos, a minha idéia da noite é que anoitece por meus olhos.
Fora de eu pensar e de haver quaisquer pensamentos
A noite anoitece concretamente.
E o fulgor das estrelas existe como se tivesse peso.
Fernando Pessoa
One thing to make sure of though – ensure that your NAS will always come up under that same ip address or your system won’t be able to mount it – and you’ll be rsyncing your home directory into your /mnt/share/homedir on your local system.
Rsync é o comando utilizado para copiar e sincronizar arquivos e diretórios remotamente, e pode ser utilizado também em sistemas de arquivos local no Linux / Unix / Mac.
Com a ajuda do comando rsync, você pode copiar e sincronizar seus arquivos remotamente e localmente através de diretórios, em discos de rede, realizar backups de dados e espelhamento entre dois computadores com Linux.
ALGUMAS VANTAGENS E CARACTERÍSTICAS DO COMANDO RSYNC
É eficiente copiar e sincronizar arquivos para ou a partir de um computador remoto.
Suporta cópia de links, propriedades de arquivos como usuário, grupos e permissões.
É mais rápido do que o scp ( Secure Copy ), porque rsync usa protocolo de atualização remota que permite transferir apenas as diferenças entre dois conjuntos de arquivos. Na primeira vez, ele copia todo o conteúdo de um arquivo ou um diretório de origem para o destino, mas a partir da próxima vez, ele copia apenas os blocos alterados e bytes para o destino.
Rsync consome menos banda , uma vez que usa o método de compressão e descompressão durante o envio e recebimento de dados em ambas as extremidades.
A SINTAXE BÁSICA DO COMANDO RSYNC
# Rsync origem destino opções
ALGUMAS OPÇÕES DO COMANDOS RSYNC
-V: verbose
-R: cópias de dados de forma recursiva (mas não preservam timestamps e permissão durante a transferência de dados
-A: modo de arquivamento, o modo de arquivo permite a cópia de arquivos de forma recursiva e também preserva links simbólicos, permissões de arquivos, posses usuário e grupo e timestamps
-Z: arquivos serão comprimidos
-H: legíveis, saída em um formato legível para humano (esse é muito bom)
COMO INSTALAR O RSYNC NO SEU COMPUTADOR COM LINUX
# yum install rsync (para distribuições baseadas em Red Hat)
# apt-get install rsync (para distribuições baseadas em Debian, o Ubuntu por exemplo)
1. COMO COPIAR / SINCRONIZAR ARQUIVO E DIRETÓRIO EM UM COMPUTADOR LOCAL COM RSYNC
Este comando irá sincronizar um único arquivo em uma máquina local. Aqui neste exemplo, o arquivo planilha.xls está sendo copiado / sincronizado para o diretório /tmp/backups
[root@e-tient]# rsync -zvh planilha.xls /tmp/backups/
created directory /tmp/backups
planilha.xls
sent 14.71M bytes received 31 bytes 3.27M bytes/sec

total size is 16.18M speedup is 1.10
No exemplo acima, você pode ver que, se o destino não existe o rsync irá criar um diretório automaticamente.
COPIAR / SINCRONIZAR UM DIRETÓRIO NO COMPUTADOR LOCAL
O comando abaixo irá transferir ou sincronizar todos os arquivos de um diretório para outro diretório na mesma máquina.
Aqui neste exemplo, /var/apt/apt/archives contém alguns arquivos de pacotes .deb
[root@e-tinet]# rsync -avzh  /var/apt/apt/archives /tmp/backups/

sending incremental file list

/var/apt/apt/archives
...
sent 4.99M bytes  received 92 bytes  3.33M bytes/sec

total size is 4.99M  speedup is 1.00
2. COPIAR / SINCRONIZAR ARQUIVOS E DIRETÓRIO COM UM COMPUTADOR REMOTO
Este comando irá sincronizar um diretório a partir de uma máquina local para uma máquina remota.
Por exemplo : Existe uma pasta no seu computador local o mesmo do exemplo anterior “/var/apt/apt/archives”, que contém alguns pacotes .deb, se quiser que o conteúdo desse diretório local seja enviado para um servidor remoto, você pode usar comando a seguir.
[root@e-tinet]$ rsync -avz /var/apt/apt/archives root@10.1.1.1:/tmp/

root@10.1.1.1's password:

sending incremental file list

...
sent 4993369 bytes  received 91 bytes  399476.80 bytes/sec

total size is 4991313  speedup is 1.00
COPIAR / SINCRONIZAR UM DIRETÓRIO REMOTO PARA UM COMPUTADOR LOCAL
Este comando irá ajudá-lo a sincronizar um diretório remoto para um diretório local. Aqui neste exemplo, um diretório:
/home/e-tinet/textos que está em um servidor remoto está sendo copiado em seu computador local em /tmp/textos.
root@10.1.1.1's password:

receiving incremental file list

created directory /tmp/textos

....
sent 91 bytes  received 4.99M bytes  322.16K bytes/sec

total size is 4.99M  speedup is 1.00
3. COMO USAR O RSYNC RODANDO COM O SSH
Com rsync, podemos usar o SSH ( Secure Shell ) para transferência de dados, usando SSH durante a transferência de nossos dados eles estarão seguros.
Além disso, quando usamos o rsync precisamos informar o usuário / senha, portanto, usando SSH seu login e senha serão enviados de forma criptografada.
COPIAR UM ARQUIVO DE UM SERVIDOR REMOTO PARA UM SERVIDOR LOCAL COM SSH
Para especificar um protocolo com rsync usamos o parametro ” -e “. Aqui neste exemplo, iremos utilizar ” ssh .
root@e-tiner]# rsync -avzhe ssh root@10.1.1.1:/root/install.log /tmp/

root@10.1.1.1's password:

receiving incremental file list

install.log

sent 30 bytes  received 8.12K bytes  1.48K bytes/sec

total size is 30.74K  speedup is 3.77
COPIAR UM ARQUIVO DE UM SERVIDOR LOCAL PARA UM SERVIDOR REMOTO COM SSH
[root@pedro]# rsync -avzhe ssh planilha.xls root@10.1.1.1:/backups/

root@10.1.1.1's password:

sending incremental file list

planilha.xls

sent 14.71M bytes  received 31 bytes  1.28M bytes/sec

total size is 16.18M  speedup is 1.10
4. MOSTRAR PROGRESSO NA TRANSFERÊNCIA DE DADOS COM RSYNC
Para mostrar o progresso durante a transferência de dados de uma máquina para outra máquina, podemos usar o ‘–progress’.
[root@e-tinet# rsync -avzhe ssh --progress /home/arquivos root@10.1.1.1:/root/arquivos

root@10.1.1.1's password:

sending incremental file list

created directory /root/arquivos
receiving file list ... done
deleting teste.txt
./
sent 26 bytes  received 390 bytes  48.94 bytes/sec
total size is 45305958  speedup is 108908.55
Uma pequena dica adicional: Tome cuidado com essa opção.
7. DEFINA O TAMANHO MÁXIMO DE ARQUIVOS QUE SERÃO TRANSFERIDOS
Você pode especificar o parâmetro “–max-size” para definir o tamanho máximo do arquivo.
Exemplo: Um arquivo de 200k , então este comando irá transferir apenas os arquivos que são iguais ou menores que 200k .
[root@e-tinet]# rsync -avzhe ssh --max-size='200k' /var/log/ root@10.1.1.2:/root/log

root@10.1.1.2's password:

sending incremental file list

created directory /root/log

...
sent 189.79K bytes  received 224 bytes  13.10K bytes/sec

total size is 38.08M  speedup is 200.43
8. APAGAR AUTOMATICAMENTE ARQUIVOS DA ORIGEM APÓS A TRANSFERÊNCIA BEM SUCEDIDA
Agora, vamos imaginar que você tenha um servidor web principal e um servidor de backup, é feito um backup diário para esse servidor de backup, agora você não quer manter essa cópia local do backup no seu servidor web.
Então, você vai esperar até que a transferência seja concluída e, em seguida, apagar aqueles arquivos de backup local manualmente?
Claro que não. Esta exclusão automática pode ser feito usando a opção ” –-remove-source-files” .
Seria praticamente um comando “mv”, mas ele pode ser até executado remotamente.
[root@e-tinet]# rsync --remove-source-files -zvh img.jpg /tmp/backups/

img.jpg

sent 14.71M bytes  received 31 bytes  4.20M bytes/sec

total size is 16.18M  speedup is 1.10
9. USAR O PARÂMETRO –DRY-RUN COM O RSYNC
Se você está aprendendo a trabalhar com rsync e não sabe exatamente um parâmetro ou outro vai fazer, tome muito cuidado pois o Rsync poderá realmente estragar sua pasta de destino, e infelizmente o Ctrl + Z não funciona nesse caso.
Usando esse parâmetro o Rsync não vai fazer nenhuma alteração no destino, apenas vai mostrar o resultado do comando normalmente, assim fica fácil você encontrar algum erro e não correr o risco de fazer uma cópia desastrosa.
root@e-tinet]# rsync --dry-run --remove-source-files -zvh texto.txt /tmp/backups/

texto.tar

sent 35 bytes  received 15 bytes  100.00 bytes/sec

total size is 16.18M  speedup is 323584.00 (DRY RUN)
10. DEFINIR LIMITE DE BANDA DE TRANSFERÊNCIA DE ARQUIVOS
Você pode configurar o limite de banda durante a transferência dos arquivos de uma máquina para outra usando o ‘ —bwlimit’.
[root@e-tinet]# rsync --bwlimit=100 -avzhe ssh  /var/log/  root@10.1.1.2:/root/log/
root@10.1.1.2's password:
sending incremental file list
sent 324 bytes  received 12 bytes  61.09 bytes/sec
total size is 38.08M  speedup is 113347.05
Então é isso, tem muitas opções o Rsync é uma ferramenta muito utilizada. Hoje eu utilizo muito para fazer backup e sincronização de arquivos, tanto local como remoto.
Para conseguir colocar um papel de parede diferente em cada área de trabalho será preciso ativar o suporte a múltiplas áreas de trabalho e instalar alguns pacotes que permitirão que você atribua vários papéis de parede para seus espaços de trabalho, com os bônus adicionais manuseio adequado de transparências e ícones dodesktop.
Como colocar um papel de parede diferente em cada área de trabalho do Ubuntu
Colocando mais de uma área de trabalho
Para habilitar mais de uma área de trabalho, faça o seguinte:
Passo 1. Abra as “Configurações do Sistema” e clique na opção “Aparência”;
Passo 2. Em “Aparência”, clique na aba “Comportamento”;
Passo 3. Dentro da aba “Comportamento”, marque a opção “Habilitar espaços de trabalho” (ou “Enable workspaces”).
Como colocar um papel de parede diferente em cada área de trabalho do Ubuntu
Para colocar um papel de parede diferente em cada área de trabalho do Ubuntu e derivados, faça o seguinte:
Passo 1. Se ainda não estiver instalado, procure e instale o Compizconfig Settings Manager e compiz-plugins-extra na Central de programas do Ubuntu (ou Ubuntu Software Center). Ou abra um terminal (Usando o Dash ou pressionando as teclas CTRL+ALT+T);
Passo 2. Atualize o APT com o comando:
sudo apt-get update
Passo 3. Agora instale o programa com o comando: sudo apt-get install compizconfig-settings-manager compiz-plugins-extra
Passo 4. Uma vez instalado, execute o programa clicando no Dash e digitando;
ccsm
Passo 5. No campo “Filtro”, digite “Wallpaper. Ative o plugin e em seguida, clique no nome dele para entrar em sua página de configurações;
Passo 6. Clique no botão “New” (Novo) e adicione alguns papéis de parede;
Passo 7. Marque a opção “Cycle Wallpapers”.
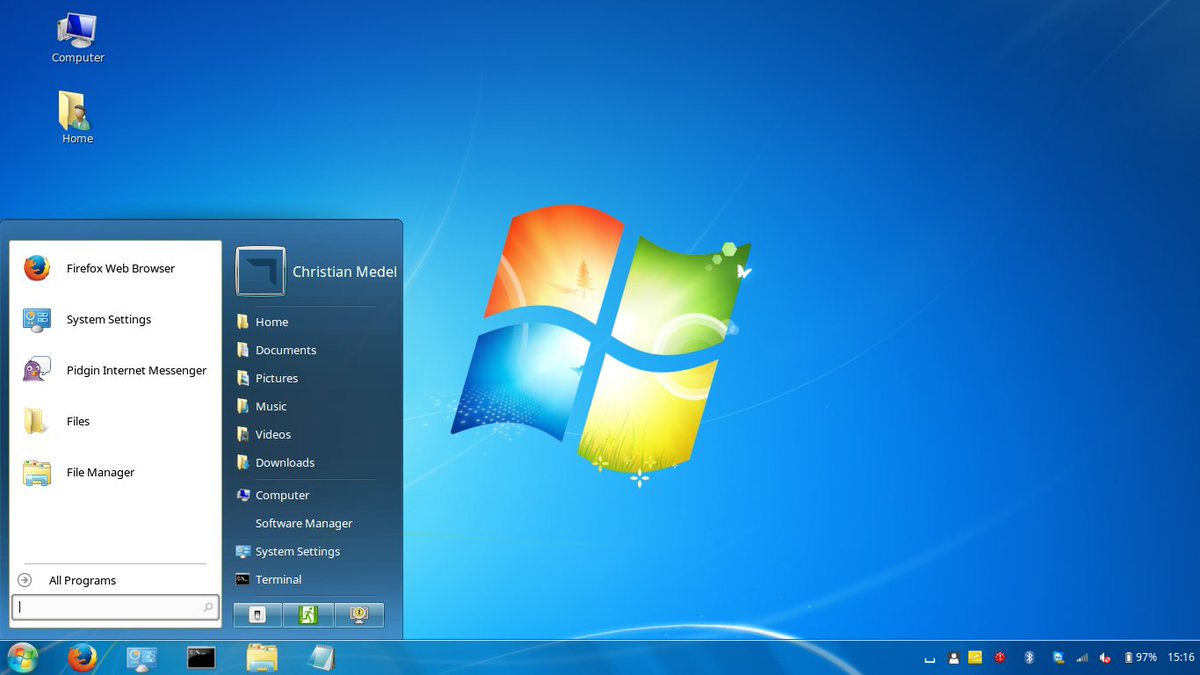
O Windows 7 perdeu o suporte por parte da Microsoft, o que significa que não terá
(provavelmente) mais atualizações, quem procura alternativas temos aqui uma sugestão.
E que tal usar O Linux MINT com uma interface parecida com a do Windows 7?
Ressaltamos que o fundo de tela demonstrada abaixo é propriedade da Microsoft.
O Linux Mint com uma interface parecida com a do Windows 7
Windows 7 Linux Mint Theme
O Linux Mint é uma das distribuições Linux mais populares do mundo.
Para quem quer dar os primeiros passos numa boa alternativa ao Windows e
também MacOS, esta é normalmente uma das distribuições Linux sugeridas,
mas é também uma das que tem maior comunidade.
Com o tema Windows 7 Linux Mint esta distribuição Linux fica com uma interface muito
parecida com a interface do Windows 7como mostram as imagens.
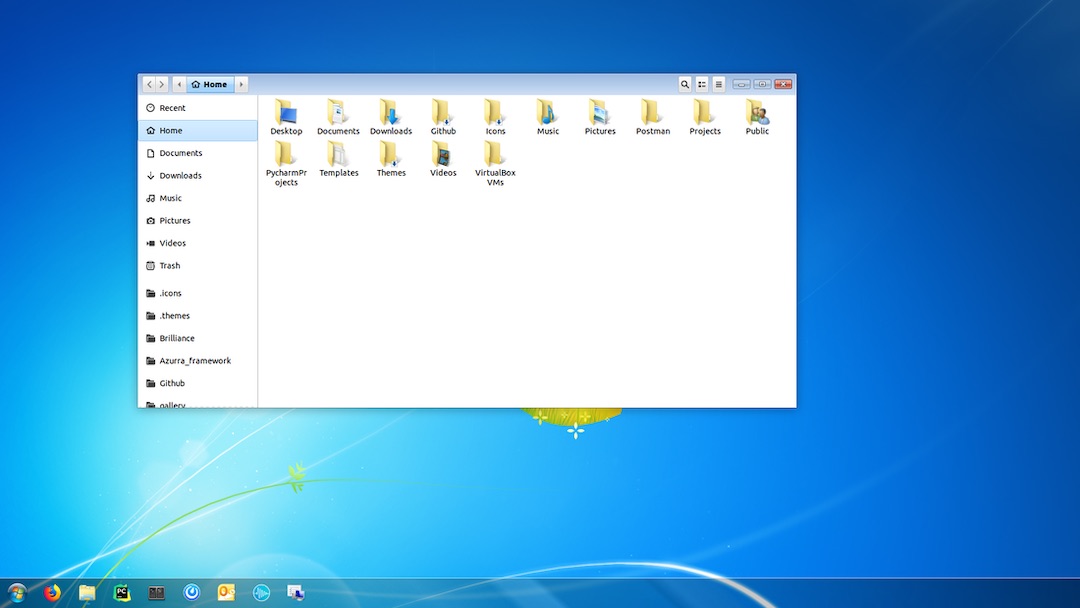
Para experimentar você pode obter o tema aqui e também o conjunto de
ícones a usar (obter aqui). Relativamente ao tema devem extrair o .zip para .themes enquanto os ícones devem ficar em .icons.
De relembrar que as pastas indicadas estão ocultas.
Para as ver basta usar o atalho ctrl + h.
Ressaltamos que o fundo de tela demonstrada abaixo é propriedade da Microsoft.
O resultado final será algo idêntico ao apresentado nas imagens seguintes. Ressaltamos que o fundo de tela demonstrada abaixo é propriedade da Microsoft.
Além do tema e ícones devem podem trocar o Menu do Linux Mint pelo Windows 7.
O papel de parede do sistema de Microsoft, em qualidade HD, pode ser obtido aqui.
Com estas alterações, apesar de ficar com um sistema parecido ao antecessor do
Windows 10, continua a ter um sistema bastante seguro. Fica a sugestão.
Nmap is short for Network Mapper. It is an open source security tool for network exploration, security scanning and auditing. However, nmap command comes with lots of options that can make the utility more robust and difficult to follow for new users. The purpose of this post is to introduce a user to the nmap command line tool to scan a host and/or network, so to find out the possible vulnerable points in the hosts. You will also learn how to use Nmap for offensive and defensive purposes. Let us see some common nmap command examples.
nmap in action
What is Nmap and what is it used for?
From the man page:
Nmap (“Network Mapper”) is an open source tool for network exploration and security auditing. It was designed to rapidly scan large networks, although it works fine against single hosts. Nmap uses raw IP packets in novel ways to determine what hosts are available on the network, what services (application name and version) those hosts are offering, what operating systems (and OS versions) they are running, what type of packet filters/firewalls are in use, and dozens of other characteristics. While Nmap is commonly used for security audits, many systems and network administrators find it useful for routine tasks such as network inventory, managing service upgrade schedules, and monitoring host or service uptime.
It was originally written by Gordon Lyon and it can answer the following questions easily:
What computers did you find running on the local network?
What IP addresses did you find running on the local network?
What is the operating system of your target machine?
Find out what ports are open on the machine that you just scanned?
Find out if the system is infected with malware or virus.
Search for unauthorized servers or network service on your network.
Find and remove computers which don’t meet the organization’s minimum level of security.
Sample setup (LAB)
Port scanning may be illegal in some jurisdictions. So setup a lab as follows:
wks01 is your computer either running Linux/OS X or Unix like operating system. It is used for scanning your local network. The nmap command must be installed on this computer.
server1 can be powered by Linux / Unix / MS-Windows operating systems. This is an unpatched server. Feel free to install a few services such as a web-server, file server and so on.
server2 can be powered by Linux / Unix / MS-Windows operating systems. This is a fully patched server with firewall. Again, feel free to install few services such as a web-server, file server and so on.
### Scan a single ip address ###nmap 192.168.1.1
## Scan a host name ###nmap server1.cyberciti.biz
## Scan a host name with more info###nmap-v server1.cyberciti.biz
Sample outputs:
Fig.01: nmap output
#2: Scan multiple IP address or subnet (IPv4)
nmap 192.168.1.1 192.168.1.2 192.168.1.3
## works with same subnet i.e. 192.168.1.0/24
nmap 192.168.1.1,2,3
You can scan a range of IP address too:
nmap 192.168.1.1-20
You can scan a range of IP address using a wildcard:
nmap 192.168.1.*
Finally, you scan an entire subnet:
nmap 192.168.1.0/24
#3: Read list of hosts/networks from a file (IPv4)
The -iL option allows you to read the list of target systems using a text file. This is useful to scan a large number of hosts/networks. Create a text file as follows:cat > /tmp/test.txt Sample outputs:
#9: Scan a network and find out which servers and devices are up and running
This is known as host discovery or ping scan:
nmap -sP 192.168.1.0/24
Sample outputs:
Host 192.168.1.1 is up (0.00035s latency).
MAC Address: BC:AE:C5:C3:16:93 (Unknown)
Host 192.168.1.2 is up (0.0038s latency).
MAC Address: 74:44:01:40:57:FB (Unknown)
Host 192.168.1.5 is up.
Host nas03 (192.168.1.12) is up (0.0091s latency).
MAC Address: 00:11:32:11:15:FC (Synology Incorporated)
Nmap done: 256 IP addresses (4 hosts up) scanned in 2.80 second
#10: How do I perform a fast scan?
nmap -F 192.168.1.1
#11: Display the reason a port is in a particular state
Starting Nmap 5.00 ( http://nmap.org ) at 2012-11-27 01:29 IST
NSE: Loaded 0 scripts for scanning.
Initiating ARP Ping Scan at 01:29
Scanning 192.168.1.1 [1 port]
Completed ARP Ping Scan at 01:29, 0.01s elapsed (1 total hosts)
Initiating Parallel DNS resolution of 1 host. at 01:29
Completed Parallel DNS resolution of 1 host. at 01:29, 0.22s elapsed
Initiating SYN Stealth Scan at 01:29
Scanning 192.168.1.1 [1000 ports]
Discovered open port 80/tcp on 192.168.1.1
Discovered open port 22/tcp on 192.168.1.1
Completed SYN Stealth Scan at 01:29, 0.16s elapsed (1000 total ports)
Initiating OS detection (try #1) against 192.168.1.1
Retrying OS detection (try #2) against 192.168.1.1
Retrying OS detection (try #3) against 192.168.1.1
Retrying OS detection (try #4) against 192.168.1.1
Retrying OS detection (try #5) against 192.168.1.1
Host 192.168.1.1 is up (0.00049s latency).
Interesting ports on 192.168.1.1:
Not shown: 998 closed ports
PORT STATE SERVICE
22/tcp open ssh
80/tcp open http
MAC Address: BC:AE:C5:C3:16:93 (Unknown)
Device type: WAP|general purpose|router|printer|broadband routerRunning (JUST GUESSING) : Linksys Linux 2.4.X (95%), Linux 2.4.X|2.6.X (94%), MikroTik RouterOS 3.X (92%), Lexmark embedded (90%), Enterasys embedded (89%), D-Link Linux 2.4.X (89%), Netgear Linux 2.4.X (89%)
Aggressive OS guesses: OpenWrt White Russian 0.9 (Linux 2.4.30) (95%), OpenWrt 0.9 - 7.09 (Linux 2.4.30 - 2.4.34) (94%), OpenWrt Kamikaze 7.09 (Linux 2.6.22) (94%), Linux 2.4.21 - 2.4.31 (likely embedded) (92%), Linux 2.6.15 - 2.6.23 (embedded) (92%), Linux 2.6.15 - 2.6.24 (92%), MikroTik RouterOS 3.0beta5 (92%), MikroTik RouterOS 3.17 (92%), Linux 2.6.24 (91%), Linux 2.6.22 (90%)
No exact OS matches for host (If you know what OS is running on it, see http://nmap.org/submit/ ).
TCP/IP fingerprint:
OS:SCAN(V=5.00%D=11/27%OT=22%CT=1%CU=30609%PV=Y%DS=1%G=Y%M=BCAEC5%TM=50B3CA
OS:4B%P=x86_64-unknown-linux-gnu)SEQ(SP=C8%GCD=1%ISR=CB%TI=Z%CI=Z%II=I%TS=7
OS:)OPS(O1=M2300ST11NW2%O2=M2300ST11NW2%O3=M2300NNT11NW2%O4=M2300ST11NW2%O5
OS:=M2300ST11NW2%O6=M2300ST11)WIN(W1=45E8%W2=45E8%W3=45E8%W4=45E8%W5=45E8%W
OS:6=45E8)ECN(R=Y%DF=Y%T=40%W=4600%O=M2300NNSNW2%CC=N%Q=)T1(R=Y%DF=Y%T=40%S
OS:=O%A=S+%F=AS%RD=0%Q=)T2(R=N)T3(R=N)T4(R=Y%DF=Y%T=40%W=0%S=A%A=Z%F=R%O=%R
OS:D=0%Q=)T5(R=Y%DF=Y%T=40%W=0%S=Z%A=S+%F=AR%O=%RD=0%Q=)T6(R=Y%DF=Y%T=40%W=
OS:0%S=A%A=Z%F=R%O=%RD=0%Q=)T7(R=N)U1(R=Y%DF=N%T=40%IPL=164%UN=0%RIPL=G%RID
OS:=G%RIPCK=G%RUCK=G%RUD=G)IE(R=Y%DFI=N%T=40%CD=S)
Uptime guess: 12.990 days (since Wed Nov 14 01:44:40 2012)
Network Distance: 1 hop
TCP Sequence Prediction: Difficulty=200 (Good luck!)
IP ID Sequence Generation: All zeros
Read data files from: /usr/share/nmap
OS detection performed. Please report any incorrect results at http://nmap.org/submit/ .
Nmap done: 1 IP address (1 host up) scanned in 12.38 seconds
Raw packets sent: 1126 (53.832KB) | Rcvd: 1066 (46.100KB)
#18: How do I detect remote services (server / daemon) version numbers?
nmap -sV 192.168.1.1
Sample outputs:
Starting Nmap 5.00 ( http://nmap.org ) at 2012-11-27 01:34 IST
Interesting ports on 192.168.1.1:
Not shown: 998 closed ports
PORT   STATE SERVICE VERSION
22/tcp open  ssh     Dropbear sshd 0.52 (protocol 2.0)
80/tcp open  http?
1 service unrecognized despite returning data.
#19: Scan a host using TCP ACK (PA) and TCP Syn (PS) ping
If firewall is blocking standard ICMP pings, try the following host discovery methods:
#22: Find out the most commonly used TCP ports using TCP SYN Scan
### Stealthy scan ###nmap-sS 192.168.1.1
### Find out the most commonly used TCP ports using TCP connect scan (warning: no stealth scan)### OS Fingerprinting ###nmap-sT 192.168.1.1
### Find out the most commonly used TCP ports using TCP ACK scannmap-sA 192.168.1.1
### Find out the most commonly used TCP ports using TCP Window scannmap-sW 192.168.1.1
### Find out the most commonly used TCP ports using TCP Maimon scannmap-sM 192.168.1.1
#23: Scan a host for UDP services (UDP scan)
Most popular services on the Internet run over the TCP protocol. DNS, SNMP, and DHCP are three of the most common UDP services. Use the following syntax to find out UDP services:
nmap -sU nas03
nmap -sU 192.168.1.1
Sample outputs:
Starting Nmap 5.00( http://nmap.org ) at 2012-11-27 00:52 IST
Stats: 0:05:29 elapsed; 0 hosts completed (1 up), 1 undergoing UDP Scan
UDP Scan Timing: About 32.49% done; ETC: 01:09 (0:11:26 remaining)
Interesting ports on nas03 (192.168.1.12):
Not shown: 995 closed ports
PORT STATE SERVICE
111/udp open|filtered rpcbind
123/udp open|filtered ntp
161/udp open|filtered snmp
2049/udp open|filtered nfs
5353/udp open|filtered zeroconf
MAC Address: 00:11:32:11:15:FC (Synology Incorporated)
Nmap done: 1 IP address (1 host up) scanned in 1099.55 seconds
#24: Scan for IP protocol
This type of scan allows you to determine which IP protocols (TCP, ICMP, IGMP, etc.) are supported by target machines:
nmap -sO 192.168.1.1
#25: Scan a firewall for security weakness
The following scan types exploit a subtle loophole in the TCP and good for testing security of common attacks:
## TCP Null Scan to fool a firewall to generate a response #### Does not set any bits (TCP flag header is 0) ##nmap-sN 192.168.1.254
## TCP Fin scan to check firewall #### Sets just the TCP FIN bit ##nmap-sF 192.168.1.254
## TCP Xmas scan to check firewall #### Sets the FIN, PSH, and URG flags, lighting the packet up like a Christmas tree ##nmap-sX 192.168.1.254
The -f option causes the requested scan (including ping scans) to use tiny fragmented IP packets. The idea is to split up the TCP header over several packets to make it harder for packet filters, intrusion detection systems, and other annoyances to detect what you are doing.
nmap -f 192.168.1.1
nmap -f fw2.nixcraft.net.in
nmap -f 15 fw2.nixcraft.net.in

## Set your own offset size with the --mtu option ##
nmap --mtu 32 192.168.1.1
#27: Cloak a scan with decoys
The -D option it appear to the remote host that the host(s) you specify as decoys are scanning the target network too. Thus their IDS might report 5-10 port scans from unique IP addresses, but they won’t know which IP was scanning them and which were innocent decoys:
### Spoof your MAC address ##nmap--spoof-mac MAC-ADDRESS-HERE 192.168.1.1
### Add other options ###nmap-v-sT-PN--spoof-mac MAC-ADDRESS-HERE 192.168.1.1
### Use a random MAC address ###### The number 0, means nmap chooses a completely random MAC address ###nmap-v-sT-PN--spoof-mac0 192.168.1.1
Pass the -T option:nmap -v -sS -A -T4 192.168.2.5 Sample outputs:
Starting Nmap 7.40 ( https://nmap.org ) at 2017-05-15 01:52 IST
NSE: Loaded 143 scripts for scanning.
NSE: Script Pre-scanning.
Initiating NSE at 01:52
Completed NSE at 01:52, 0.00s elapsed
Initiating NSE at 01:52
Completed NSE at 01:52, 0.00s elapsed
Initiating ARP Ping Scan at 01:52
Scanning 192.168.2.15 [1 port]
Completed ARP Ping Scan at 01:52, 0.01s elapsed (1 total hosts)
Initiating SYN Stealth Scan at 01:52
Scanning dellm6700 (192.168.2.15) [1000 ports]
Discovered open port 5900/tcp on 192.168.2.15
Discovered open port 80/tcp on 192.168.2.15
Discovered open port 22/tcp on 192.168.2.15
Completed SYN Stealth Scan at 01:53, 4.62s elapsed (1000 total ports)
Initiating Service scan at 01:53
Scanning 3 services on dellm6700 (192.168.2.15)
Completed Service scan at 01:53, 6.01s elapsed (3 services on 1 host)
Initiating OS detection (try #1) against dellm6700 (192.168.2.15)
Retrying OS detection (try #2) against dellm6700 (192.168.2.15)
NSE: Script scanning 192.168.2.15.
Initiating NSE at 01:53
Completed NSE at 01:53, 30.02s elapsed
Initiating NSE at 01:53
Completed NSE at 01:53, 0.00s elapsed
Nmap scan report for dellm6700 (192.168.2.15)
Host is up (0.00044s latency).
Not shown: 996 filtered ports
PORT     STATE  SERVICE VERSION
22/tcp   open   ssh     (protocol 2.0)
| fingerprint-strings:
|   NULL:
|_    SSH-2.0-OpenSSH_7.4p1 Ubuntu-10
| ssh-hostkey:
|   2048 1d:14:84:f0:c7:21:10:0e:30:d9:f9:59:6b:c3:95:97 (RSA)
|_  256 dc:59:c6:6e:33:33:f2:d2:5d:9b:fd:b4:9c:52:c1:0a (ECDSA)
80/tcp   open   http    nginx 1.10.0 (Ubuntu)
| http-methods:
|_  Supported Methods: GET HEAD
|_http-server-header: nginx/1.10.0 (Ubuntu)
|_http-title: Apache2 Ubuntu Default Page: It works
443/tcp  closed https
5900/tcp open   vnc     VNC (protocol 3.7)
1 service unrecognized despite returning data. If you know the service/version, please submit the following fingerprint at https://nmap.org/cgi-bin/submit.cgi?new-service :
SF-Port22-TCP:V=7.40%I=7%D=5/15%Time=5918BCAA%P=x86_64-apple-darwin16.3.0%
SF:r(NULL,20,"SSH-2\.0-OpenSSH_7\.4p1\x20Ubuntu-10\n");
MAC Address: F0:1F:AF:1F:2C:60 (Dell)
Device type: general purpose
Running (JUST GUESSING): Linux 3.X|4.X|2.6.X (95%), OpenBSD 4.X (85%)
OS CPE: cpe:/o:linux:linux_kernel:3 cpe:/o:linux:linux_kernel:4 cpe:/o:linux:linux_kernel:2.6.32 cpe:/o:openbsd:openbsd:4.0
Aggressive OS guesses: Linux 3.11 - 4.1 (95%), Linux 4.4 (95%), Linux 3.13 (92%), Linux 4.0 (90%), Linux 2.6.32 (89%), Linux 2.6.32 or 3.10 (89%), Linux 3.2 - 3.8 (89%), Linux 3.10 - 3.12 (88%), Linux 2.6.32 - 2.6.33 (87%), Linux 2.6.32 - 2.6.35 (87%)
No exact OS matches for host (test conditions non-ideal).
Uptime guess: 0.000 days (since Mon May 15 01:53:08 2017)
Network Distance: 1 hop
TCP Sequence Prediction: Difficulty=252 (Good luck!)
IP ID Sequence Generation: All zeros
Service Info: OS: Linux; CPE: cpe:/o:linux:linux_kernel

TRACEROUTE
HOP RTT     ADDRESS
1   0.44 ms dellm6700 (192.168.2.15)

NSE: Script Post-scanning.
Initiating NSE at 01:53
Completed NSE at 01:53, 0.00s elapsed
Initiating NSE at 01:53
Completed NSE at 01:53, 0.00s elapsed
Read data files from: /usr/local/bin/../share/nmap
OS and Service detection performed. Please report any incorrect results at https://nmap.org/submit/ .
Nmap done: 1 IP address (1 host up) scanned in 46.02 seconds
           Raw packets sent: 2075 (95.016KB) | Rcvd: 50 (3.084KB)
Zenmap is the official Nmap Security Scanner GUI. It is a multi-platform (Linux, Windows, Mac OS X, BSD, etc.) free and open source application which aims to make Nmap easy for beginners to use while providing advanced features for experienced Nmap users. Frequently used scans can be saved as profiles to make them easy to run repeatedly. A command creator allows interactive creation of Nmap command lines. Scan results can be saved and viewed later. Saved scan results can be compared with one another to see how they differ. The results of recent scans are stored in a searchable database.
You can install zenmap using the following apt-get command:$ sudo apt-get install zenmap Sample outputs:
[sudo] password for vivek:
Reading package lists... Done
Building dependency tree
Reading state information... Done
The following NEW packages will be installed:
  zenmap
0 upgraded, 1 newly installed, 0 to remove and 11 not upgraded.
Need to get 616 kB of archives.
After this operation, 1,827 kB of additional disk space will be used.
Get:1 http://debian.osuosl.org/debian/ squeeze/main zenmap amd64 5.00-3 [616 kB]
Fetched 616 kB in 3s (199 kB/s)
Selecting previously deselected package zenmap.
(Reading database ... 281105 files and directories currently installed.)
Unpacking zenmap (from .../zenmap_5.00-3_amd64.deb) ...
Processing triggers for desktop-file-utils ...
Processing triggers for gnome-menus ...
Processing triggers for man-db ...
Setting up zenmap (5.00-3) ...
Processing triggers for python-central ...
Type the following command to start zenmap:$ sudo zenmap Sample outputs