
O Universo não é uma idéia minha. A minha idéia do Universo é que é uma idéia minha. A noite não anoitece pelos meus olhos, a minha idéia da noite é que anoitece por meus olhos. Fora de eu pensar e de haver quaisquer pensamentos A noite anoitece concretamente. E o fulgor das estrelas existe como se tivesse peso. Fernando Pessoa
sábado, 23 de dezembro de 2017
Do You Hear The People Sing? ------ Você Ouve As Pessoas Cantarem?
Do You Hear The People Sing?
Do you hear the people sing?
Singing a song of angry men?
It is the music of a people
Who will not be slaves again!
Singing a song of angry men?
It is the music of a people
Who will not be slaves again!
When the beating of your heart
Echoes the beating of the drums
There is a life about to start
When tomorrow comes!
Echoes the beating of the drums
There is a life about to start
When tomorrow comes!
Will you join in our crusade?
Who will be strong and stand with me?
Beyond the barricade
Is there a world you long to see?
Then join in the fight
That will give you the right to be free!
Who will be strong and stand with me?
Beyond the barricade
Is there a world you long to see?
Then join in the fight
That will give you the right to be free!
Do you hear the people sing?
Singing a song of angry men?
It is the music of a people
Who will not be slaves again!
Singing a song of angry men?
It is the music of a people
Who will not be slaves again!
When the beating of your heart
Echoes the beating of the drums
There is a life about to start
When tomorrow comes!
Echoes the beating of the drums
There is a life about to start
When tomorrow comes!
Will you give all you can give
So that our banner may advance
Some will fall and some will live
Will you stand up and take your chance?
The blood of the martyrs
Will water the meadows of France!
So that our banner may advance
Some will fall and some will live
Will you stand up and take your chance?
The blood of the martyrs
Will water the meadows of France!
Do you hear the people sing?
Singing a song of angry men?
It is the music of a people
Who will not be slaves again!
Singing a song of angry men?
It is the music of a people
Who will not be slaves again!
When the beating of your heart
Echoes the beating of the drums
There is a life about to start
When tomorrow comes!
Echoes the beating of the drums
There is a life about to start
When tomorrow comes!
Você Ouve As Pessoas Cantarem?
Você ouve as pessoas cantarem?
Cantando a canção dos homens furiosos
Essa é a música de um povo
Que não será escravo novamente
Cantando a canção dos homens furiosos
Essa é a música de um povo
Que não será escravo novamente
Quando a batida do seu coração
Echoa na batida dos tambores
Há uma vida prestes a se iniciar
Quando a manhã chegar
Echoa na batida dos tambores
Há uma vida prestes a se iniciar
Quando a manhã chegar
Você vai se unir a nossa cruzada?
Você será forte e ficará comigo?
Além da barricada
Há um mundo para se ver por muito tempo?
Então junte-se à luta
E você ganhará o direito de ser livre
Você será forte e ficará comigo?
Além da barricada
Há um mundo para se ver por muito tempo?
Então junte-se à luta
E você ganhará o direito de ser livre
Você ouve as pessoas cantarem?
Cantando a canção dos homens furiosos
Essa é a música de um povo
Que não será escravo novamente
Cantando a canção dos homens furiosos
Essa é a música de um povo
Que não será escravo novamente
Quando a batida do seu coração
Echoa na batida dos tambores
Há uma vida prestes a se iniciar
Quando a manhã chegar
Echoa na batida dos tambores
Há uma vida prestes a se iniciar
Quando a manhã chegar
Você dará tudo que pode dar
Para que nosso estandarte possa avançar?
Alguns vão morrer e alguns vão viver
Você vai se erguer e agarrar sua chance?
O sangue dos mártires
Vai regar os prados da França!
Para que nosso estandarte possa avançar?
Alguns vão morrer e alguns vão viver
Você vai se erguer e agarrar sua chance?
O sangue dos mártires
Vai regar os prados da França!
Você ouve as pessoas cantarem?
Cantando a canção dos homens furiosos
Essa é a música de um povo
Que não será escravo novamente
Cantando a canção dos homens furiosos
Essa é a música de um povo
Que não será escravo novamente
Quando a batida do seu coração
Echoa na batida dos tambores
Há uma vida prestes a se iniciar
Quando a manhã chegar
Echoa na batida dos tambores
Há uma vida prestes a se iniciar
Quando a manhã chegar
quinta-feira, 7 de dezembro de 2017
Atalhos de teclado no Windows - Windows 10
Atalhos
de teclado são teclas ou combinações de teclas que fornecem uma maneira
alternativa de fazer algo que você normalmente faria com um mouse.
Atalhos de teclado adicionais
- Atalhos de teclado em aplicativos
- Atalhos de teclado de acessibilidade do Windows
- Atalhos de teclado do Microsoft Surface Hub
- Atalhos de teclado do Continuum para telefones
Copiar, colar e outros atalhos de teclado gerais
| Pressione estas teclas | Para fazer isto |
|---|---|
| Ctrl + X | Recortar o item selecionado |
| Ctrl + C (ou Ctrl + Insert) | Copiar o item selecionado |
| Ctrl + V (ou Shift + Insert) | Colar o item selecionado |
| Ctrl + Z | Desfazer uma ação |
| Alt + Tab | Alternar aplicativos abertos |
| Alt+F4 | Fechar o item ativo ou sair do aplicativo ativo |
| Tecla do logotipo do Windows + L | Bloquear seu computador |
| Tecla do logotipo do Windows + D | Exibir e ocultar a área de trabalho |
| F2 | Renomear o item selecionado |
| F3 | Procurar um arquivo ou uma pasta no Explorador de Arquivos |
| F4 | Exibir a lista da barra de endereços no Explorador de Arquivos |
| F5 | Atualizar a janela ativa |
| F6 | Percorrer elementos da tela de uma janela ou da área de trabalho |
| F10 | Ativar a barra de menus no aplicativo ativo |
| Alt + F8 | Mostrar sua senha na tela de credenciais |
| Alt + Esc | Percorrer itens na ordem em que foram abertos |
| Alt + letra sublinhada | Executar o comando referente a essa letra |
| Alt + Enter | Exibir propriedades do item selecionado |
| Alt + Barra de espaço | Abrir o menu de atalho da janela ativa |
| Alt + Seta para a esquerda | Voltar |
| Alt + Seta para a direita | Avançar |
| Alt + Page Up | Mover uma tela para cima |
| Alt + Page Down | Mover uma tela para baixo |
| Ctrl + F4 | Fechar o documento ativo (em aplicativos que sejam de tela inteira e permitam vários documentos abertos ao mesmo tempo) |
| Ctrl + A | Selecionar todos os itens em um documento ou em uma janela |
| Ctrl + D (ou Delete) | Excluir o item selecionado e movê-lo para a Lixeira |
| Ctrl + R (ou F5) | Atualizar a janela ativa |
| Ctrl + Y | Refazer uma ação |
| Ctrl + Seta para a direita | Mover o cursor para o início da próxima palavra |
| Ctrl + Seta para a esquerda | Mover o cursor para o início da palavra anterior |
| Ctrl + Seta para baixo | Mover o cursor para o início do próximo parágrafo |
| Ctrl + Seta para cima | Mover o cursor para o início do parágrafo anterior |
| Ctrl + Alt + Tab | Usar as teclas de direção para alternar entre todos os aplicativos abertos |
| Ctrl + Alt + Shift + teclas de direção | Quando um grupo ou bloco está em foco no menu Iniciar, movê-lo na direção especificada |
| Ctrl + tecla de direção (para ir até um item) + Barra de espaço | Selecionar vários itens separadamente em uma janela ou na área de trabalho |
| Ctrl + Shift com uma tecla de direção | Selecionar um bloco de texto |
| Ctrl + Esc | Abrir Iniciar |
| Ctrl + Shift + Esc | Abrir o Gerenciador de Tarefas |
| Ctrl + Shift | Mudar o layout do teclado quando houver vários layouts de teclado disponíveis |
| Ctrl + Barra de espaço | Ativar ou desativar o IME do idioma chinês |
| Shift+F10 | Exibir o menu de atalho do item selecionado |
| Shift com qualquer tecla de direção | Selecionar mais de um item em uma janela ou na área de trabalho, ou selecionar texto em um documento |
| Shift + Delete | Excluir o item selecionado sem movê-lo para a Lixeira primeiro |
| Seta para a direita | Abrir o próximo menu à direita ou abrir um submenu |
| Seta para a esquerda | Abrir o próximo menu à esquerda ou fechar um submenu |
| Esc | Parar ou encerrar a tarefa atual |
Atalhos de teclado da tecla do logotipo do Windows
| Pressione esta tecla | Para fazer isto |
|---|---|
| Tecla do logotipo do Windows | Abrir ou fechar Iniciar |
| Tecla do logotipo do Windows + A | Abrir a Central de ações |
| Tecla do logotipo do Windows + B | Definir o foco na área de notificação |
| Tecla do logotipo do Windows + C |
Abrir a Cortana no modo de escuta
Observações
|
| Tecla do logotipo do Windows + Shift + C | Abrir o menu de botões |
| Tecla do logotipo do Windows + D | Exibir e ocultar a área de trabalho |
| Tecla do logotipo do Windows + Alt + D | Exibir e ocultar data e hora na área de trabalho |
| Tecla do logotipo do Windows + E | Abrir o Explorador de Arquivos |
| Tecla do logotipo do Windows + F | Abrir o Hub de Feedback e tirar uma captura de tela |
| Tecla do logotipo do Windows + G | Abrir a Barra de jogo quando um jogo for aberto |
| Tecla do logotipo do Windows + H | Iniciar ditado |
| Tecla do logotipo do Windows + I | Abrir as Configurações |
| Tecla do logotipo do Windows + J | Definir o foco para uma dica do Windows quando houver uma disponível. Quando uma dica do Windows aparecer, leve o foco para a dica. Pressionar os atalhos de teclado novamente leva o foco para o elemento na tela ao qual a dica do Windows está ancorada. |
| Tecla do logotipo do Windows + K | Abrir a ação rápida Conectar |
| Tecla do logotipo do Windows + L | Bloquear seu computador ou mudar de conta |
| Tecla do logotipo do Windows + M | Minimizar todas as janelas |
| Tecla do logotipo do Windows + O | Bloquear a orientação do dispositivo |
| Tecla do logotipo do Windows + P | Escolher um modo de exibição da apresentação |
| Tecla do logotipo do Windows + R | Abrir a caixa de diálogo Executar |
| Tecla do logotipo do Windows + S | Abrir a pesquisa |
| Tecla do logotipo do Windows + T | Percorrer aplicativos na barra de tarefas |
| Tecla do logotipo do Windows + U | Abrir a Central de Facilidade de Acesso |
| Tecla do logotipo do Windows + V | Percorrer notificações |
| Tecla do logotipo do Windows + Shift + V | Percorrer notificações na ordem inversa |
| Tecla do logotipo do Windows + X | Abrir o menu Link Rápido |
| Tecla do logotipo do Windows + Y | Alternar entrada entre o Windows Mixed Reality e a área de trabalho |
| Tecla do logotipo do Windows + Z | Mostrar os comandos disponíveis em um aplicativo no modo de tela inteira |
| Tecla do logotipo do Windows + ponto (.) ou ponto e vírgula (;) | Abrir painel de emojis |
| Tecla do logotipo do Windows + vírgula (,) | Espiar temporariamente a área de trabalho |
| Tecla do logotipo do Windows + Pause | Abrir a caixa de diálogo Propriedades do Sistema |
| Tecla do logotipo do Windows + Ctrl + F | Procurar PCs (se você estiver em uma rede) |
| Tecla do logotipo do Windows + Shift + M | Restaurar janelas minimizadas na área de trabalho |
| Tecla do logotipo do Windows + número | Abrir a área de trabalho e iniciar o aplicativo fixado na barra de tarefas, na posição indicada pelo número. Se o aplicativo já estiver em execução, mudar para esse aplicativo. |
| Tecla do logotipo do Windows + Shift + número | Abrir a área de trabalho e iniciar uma nova instância do aplicativo fixado na barra de tarefas, na posição indicada pelo número |
| Tecla do logotipo do Windows + Ctrl + número | Abrir a área de trabalho e mudar para a última janela ativa do aplicativo fixado na barra de tarefas, na posição indicada pelo número |
| Tecla do logotipo do Windows + Alt + número | Abrir a área de trabalho e abrir a Lista de Atalhos do aplicativo fixado na barra de tarefas, na posição indicada pelo número |
| Tecla do logotipo do Windows + Ctrl + Shift + número | Abrir a área de trabalho e abrir, como administrador, uma nova instância do aplicativo localizado na posição especificada da barra de tarefas |
| Tecla do logotipo do Windows + Tab | Abrir a Visão de tarefas |
| Tecla do logotipo do Windows + seta para cima | Maximizar a janela |
| Tecla do logotipo do Windows + seta para baixo | Remover o aplicativo atual da tela ou minimizar a janela da área de trabalho |
| Tecla do logotipo do Windows + seta para a esquerda | Maximizar a janela do aplicativo ou da área de trabalho, no lado esquerdo da tela |
| Tecla do logotipo do Windows + seta para a direita | Maximizar a janela do aplicativo ou da área de trabalho, no lado direito da tela |
| Tecla do logotipo do Windows + Home | Minimizar todas as janelas da área de trabalho, exceto a ativa (restaura todas as janelas com um segundo pressionamento) |
| Tecla do logotipo do Windows + Shift + Seta para cima | Alongar a janela da área de trabalho até as partes superior e inferior da tela |
| Tecla do logotipo do Windows + Shift + Seta para baixo | Restaurar/minimizar janelas ativas da área de trabalho verticalmente, mantendo a largura |
| Tecla do logotipo do Windows + Shift + Seta para a esquerda ou seta para a direita | Mover um aplicativo ou uma janela na área de trabalho, de um monitor para outro |
| Tecla do logotipo do Windows + Barra de espaço | Mudar o idioma de entrada e o layout do teclado |
| Tecla do logotipo do Windows + Ctrl + Barra de espaço | Alterar para uma entrada selecionada anteriormente |
| Tecla de logotipo do Windows + Ctrl + Enter | Abrir o Narrador |
| Tecla do logotipo do Windows + barra (/) | Iniciar reconversão do IME |
| Tecla do logotipo do Windows + Ctrl + V | Abrir alertas |
Atalhos de teclado do prompt de comando
| Pressione estas teclas | Para fazer isto |
|---|---|
| Ctrl + C (ou Ctrl + Insert) | Copiar o texto selecionado |
| Ctrl + V (ou Shift + Insert) | Colar o texto selecionado |
| Ctrl + M | Entrar no modo de marca |
| Alt + tecla de seleção | Começar seleção no modo de bloqueio |
| Teclas de direção | Mover o cursor na direção especificada |
| Page Up | Mover o cursor uma página acima |
| Page Down | Mover o cursor uma página abaixo |
| Ctrl + Home (modo de marca) | Mover o cursor para o início do próximo buffer |
| Ctrl + End (modo de marca) | Mover o cursor para o final do próximo buffer |
| Ctrl + Seta para cima | Mover uma linha acima no histórico de saída |
| Ctrl + Seta para baixo | Mover uma linha abaixo no histórico de saída |
| Ctrl + Home (navegação no Histórico) | Se a linha de comando estiver vazia, mova o visor para o início do buffer. Do contrário, exclua todos os caracteres à esquerda do cursor na linha de comando. |
| Ctrl + End (navegação no Histórico) | Se a linha de comando estiver vazia, mova o visor para a linha de comando. Do contrário, exclua todos os caracteres à direita do cursor na linha de comando. |
Atalhos de teclado de caixas de diálogo
| Pressione esta tecla | Para fazer isto |
|---|---|
| F4 | Exibir os itens na lista ativa |
| Ctrl + Tab | Avançar nas guias |
| Ctrl + Shift + Tab | Voltar nas guias |
| Ctrl + número (número de 1 a 9) | Mover para guia n |
| Tab | Avançar nas opções |
| Shift + Tab | Voltar nas opções |
| Alt + letra sublinhada | Executar o comando (ou selecionar a opção) que é usada com essa letra |
| Barra de espaço | Marcar ou desmarcar a caixa de seleção caso a opção ativa seja uma caixa de seleção |
| Backspace | Abrir uma pasta um nível acima caso uma pasta esteja selecionada na caixa de diálogo Salvar Como ou Abrir |
| Teclas de direção | Selecionar um botão caso a opção ativa seja um grupo de botões de opção |
Atalhos de teclado do Explorador de Arquivos
| Pressione esta tecla | Para fazer isto |
|---|---|
| Alt + D | Selecionar a barra de endereços |
| Ctrl + E | Selecionar a caixa de pesquisa |
| Ctrl + F | Selecionar a caixa de pesquisa |
| Ctrl + N | Abrir uma nova janela |
| Ctrl + W | Fechar a janela ativa |
| Ctrl + roda de rolagem do mouse | Alterar o tamanho e a aparência dos ícones de arquivo e pasta |
| Ctrl + Shift + E | Exibir todas as pastas acima da pasta selecionada |
| Ctrl + Shift + N | Criar uma nova pasta |
| Num Lock + asterisco (*) | Exibir todas as subpastas da pasta selecionada |
| Num Lock + adição (+) | Exibir o conteúdo da pasta selecionada |
| Num Lock + subtração (-) | Recolher a pasta selecionada |
| Alt + P | Exibir o painel de visualização |
| Alt + Enter | Abrir a caixa de diálogo Propriedades do item selecionado |
| Alt + Seta para a direita | Exibir a próxima pasta |
| Alt + Seta para cima | Exibir a pasta na qual a pasta estava |
| Alt + Seta para a esquerda | Exibir a pasta anterior |
| Backspace | Exibir a pasta anterior |
| Seta para a direita | Exibir a seleção atual (se estiver recolhida) ou selecionar a primeira subpasta |
| Seta para a esquerda | Recolher a seleção atual (se estiver expandida) ou selecionar a pasta na qual a pasta atual estava |
| End | Exibir a parte inferior da janela ativa |
| Home | Exibir a parte superior da janela ativa |
| F11 | Maximizar ou minimizar a janela ativa |
Atalhos de teclado das áreas de trabalho virtuais
| Pressione esta tecla | Para fazer isto |
|---|---|
| Tecla do logotipo do Windows + Tab | Abrir a Visão de tarefas |
| Tecla do logotipo do Windows + Ctrl + D | Adicionar uma área de trabalho virtual |
| Tecla do logotipo do Windows + Ctrl + Seta para a direita | Alternar áreas de trabalho virtuais criadas à direita |
| Tecla do logotipo do Windows + Ctrl + Seta para a esquerda | Alternar áreas de trabalho virtuais criadas à esquerda |
| Tecla do logotipo do Windows + Ctrl + F4 | Fechar a área de trabalho virtual que você está usando |
Atalhos de teclado da barra de tarefas
| Pressione esta tecla | Para fazer isto |
|---|---|
| Shift + clique em um botão da barra de tarefas | Abrir um aplicativo ou abrir rapidamente outra instância de um aplicativo |
| Ctrl + Shift + clique em um botão da barra de tarefas | Abrir um aplicativo como um administrador |
| Shift + clique com o botão direito do mouse em um botão da barra de tarefas | Mostrar o menu da janela do aplicativo |
| Shift + clique com o botão direito do mouse em um botão da barra de tarefas agrupado | Mostrar o menu da janela do grupo |
| Ctrl + clique em um botão da barra de tarefas agrupado | Alternar as janelas do grupo |
Atalhos de teclado das configurações
| Pressione esta tecla | Para fazer isto |
|---|---|
| Tecla do logotipo do Windows + I | Abrir configurações |
| Backspace | Voltar para a home page de configurações |
| Digitar em qualquer página com a caixa de pesquisa | Configurações de pesquisa |
Em : 7/12/2017
domingo, 3 de dezembro de 2017
SAMBA NO NETWARE 6.5 - Universal Send using SMB (CIFS) on a Netware 5.x 6.x Server
1. What does this page mean to me?
Universal Send's Netware IPX supports “send to file” in a Netware environment using the IPX/SPX protocol only.
Using Novell's Native File Access for Windows it is possible to configure Netware servers running IP only to use CIFS (SMB) over TCP/IP.
2. How can this help me?
Once Novell's Native File Access for Windows is installed on the Netware server, you can access shared directories without the need for Novell's Client 32
In the case of Universal Send, you will be able to push a file to a Netware server using SMB over IP
3. What is CIFS?
CIFS is an acronym for the Common Internet File System
It is the standard way that computer users share files across corporate intranets and the Internet.
CIFS is an enhanced version of Microsoft's Server Message Block (SMB) protocol,
Under Netware 5.x and 6.x, CIFS is available through installation of the Novell Native File Access Pack
4. What is the Novell Native File Access Pack? How do I get it?
The Novell Native File Access Pack is included with the Netware 6.x operating system CD.
This document will outline it's installation and configuration
The Novell Native File Access Pack is not included with Netware 5.1
It must be purchased from Novell
More info on that here
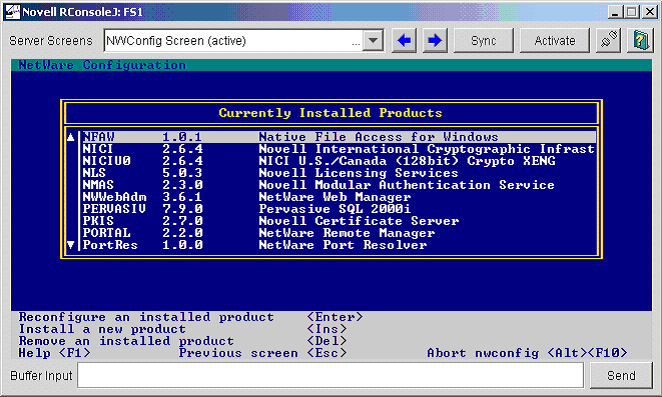
5. How do I check if Novell's Native File Access for Windows is installed?
nwconfig, Product Options, View/Configure/Remove Installed products
6. How do I install the Novell's Native File Access Pack for Netware 6.x
Get your Netware 6.x Operating System CD ready
I know of three ways
1. Installing Native File Access using the Netware Deployment Manager
2. Installing Native File Access on the Netware Server with NWCONFIG
3. Installing Native File Access on the Netware Server with Console1
1. Installing Native File Access using the Netware Deployment Manager
Obtain the Netware 6 Operating System CD.
Ensure your Netware 6 server meets the Netware Server Prerequisites
Ensure your Administrator Workstation meets the Administrator Workstation Prerequisites
At the Administrator Workstation, log in to the destination server that will run the Novell Native File Access Protocols software.
Insert the Netware 6 Operating System CD.
Run Netware Deployment Manager (NWDEPLOY.EXE) located on the root of the Netware 6 Operating System CD.
Click Post-Installation Tasks > Install Netware 6 Products.
HINT: If you are prompted to log in again while running Netware Deployment Manager, you can enter the IP address of the server by clicking Details
Follow along with the installation to install and configure Novell's Native File Access for Windows
2. Installing Native File Access on the Netware Server with NWCONFIG
Place the Netware 6 Operating System CD into the CDROM
Type volume
You will probably see something like this

Look under flags for NSS RO P
If you do not, you will probably have to load the CDROM modules
Type cdrom
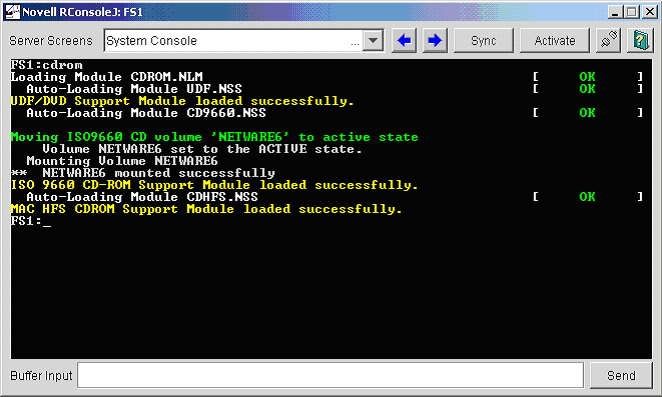
Now type volume
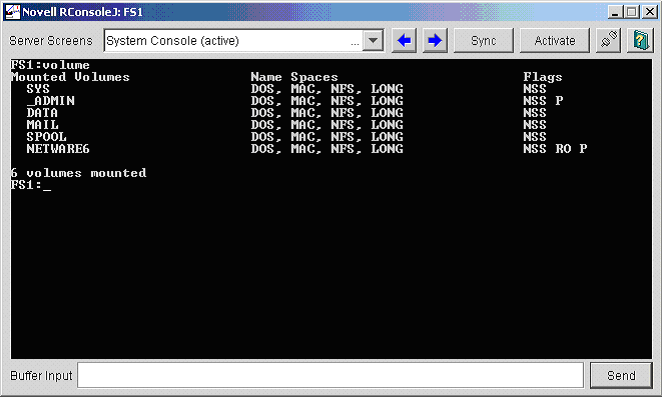
See Netware6 that's the Netware 6 Operating System CD
The Mounted volume name Netware6 is important, we'll need that in a sec
We'll use nwconfig again here
nwconfig, Product Options, Install a Product Not listed, F3 (Specify a Path), volume name:
In this case volume name is netware6: (Don't forget the colon)
Novell Install Services will begin, click here to continue
3. Installing Native File Access on the Netware Server with Console1
Startx if it isnt already running (startx)
Click Novell > Install.
At the Installed Products screen, click Add.
Enter the path to the Netware 6 Operating System CD and select the PRODUCT.NI file.
The Netware installation program, Novell Install Services will begin
The Netware Installation Program - Novell Install Services
Wait for a bit while The X window installer starts up
You will be asked "Please select the components to install"
Use clear all and then select "Novell Native File Access Pack"
Authenticate with admin rights
Confirm or change the LDAP ports if desired
Select Native File Access for Windows (Mac and Unix is optional)
Enter a Server Name and Server Comment (The name and comment seen in Network Neighborhood)
More on configuration is here
Enter a Workgroup or Domain name, WINS, or PDC
Select any or all IP address's bound to CIFS
Choose either sharing of all mounted volumes or specify specific volumes
Enter the NDS context searched for CIFS users
Click next to confirm and next to finish
The files are now installed
BTW since you installed files from the Netware 6 Operating System CD, will need to install your service pack again (Doh)
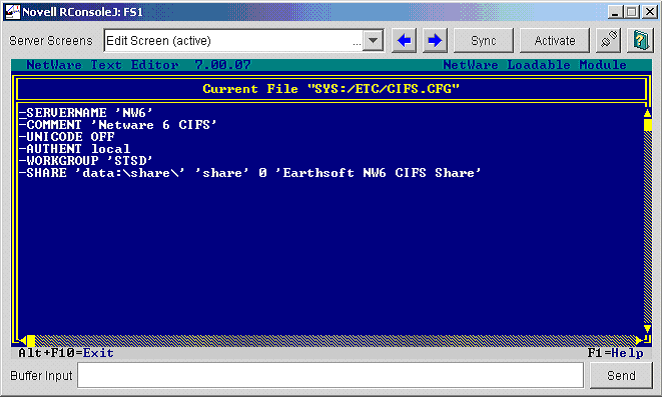
7. How do I configure Novell's Native File Access for Windows (CIFS) under Netware 6 SP3 and earlierDuring the installation, I answered these questions as follows
| Server Name | NW6 |
| Server Comment | Netware 6 CIFS |
| Unicode | OFF |
| Authentication | local |
| Workgroup/Domain | STSD |
| Shared Resource | data:/share |
| Share Name | share |
| Connections | Unlimited |
| Share Comment | Earthsoft NW6 CIFS Share |
These configuration settings which are stored in /etc/cifs.cfg have the following syntax
You can edit /etc/cifs.cfg manually or use the following configuration shortcuts
CIFS SHARE ADD ' localpath ' ' sharename ' connectionlimit ' comment ' adds a new sharepoint and also adds the command to the CIFS.CFG file.
CIFS SHARE REMOVE ' sharename ' removes the sharepoint and comments it out of the CIFS.CFG file.
CIFS will look for users in the contexts you specify at the time of installation
This configuration file is /etc/cifsctxs.cfg
8. How do I configure Novell's Native File Access for Windows (CIFS) under Netware 6 SP4 and later?
After you have installed Netware 6 Support Pack 4, you must configure your Windows/CIFS network environment with ConsoleOne.
Previously, CIFS parameters were configured by manually editing sys:\etc\cifs.cfg.
That file now contains a note telling you to use ConsoleOne for CIFS configuration.
Start ConsoleOne
Right click on the Server Object, select properties
Click the CIFS tab
Edit Config, Attach, Shares as required
CIFS SHARE ADD and CIFS SHARE REMOVE seem not to have effect now
Note:
If eDirectory is reinstalled on a server running CIFS with the Netware 6 Support Pack 4, the ConsoleOne CIFS management does not automatically reimport the cifs.cfg configuration into ConsoleOne.
To reimport the configuration, un comment lines starting with ### from sys:etc\cifs.cfg and then run CIFSSTOP and CIFSSTRT.
9. How do I start/stop Novell's Native File Access for Windows
The autoexec.ncf file has been modified to start the Native File Access types you chose
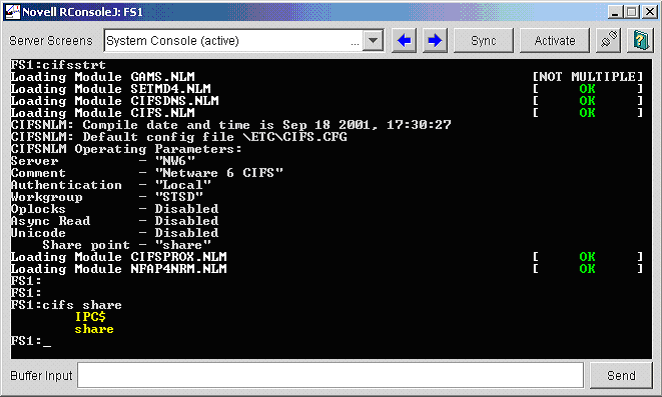
To start cifs manually (to avoid a reboot), type cifsstrt
Use cifsstop or cifsstrt to stop or start cifs to read any configuration changes
Typing cifsstrt
Typing cifsstop
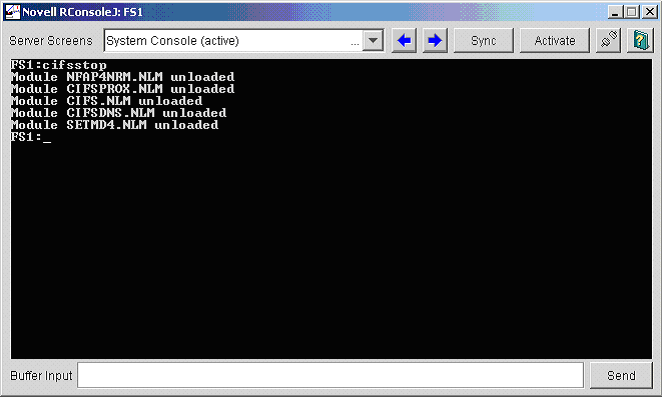
BTW on my Netware 6 SP4 box I get this error when using cifsstop
You must unload NFAP4NRM.NLM before you can unload CIFS.NLM ...
I didnt read the SP4 documentation so it's probably explained there
I fixed it by simply removing the # in #UNLOAD nfap4nrm.nlm in SYS:SYSTEM\CIFSSTOP.NCF
10. How do I View Configuration Details about Novell's Native File Access for Windows (CIFS)
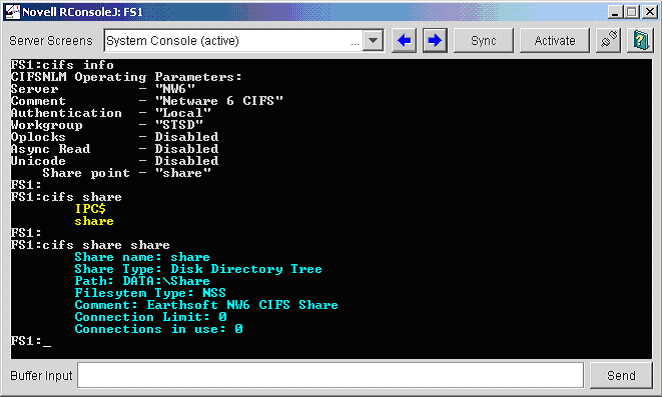
You can view details about how Novell Native File Access Protocols are configured by entering the following commands at the server console.
CIFS INFO displays operational information.
CIFS SHARE displays all active sharepoints.
CIFS SHARE sharename displays information about a specific sharepoint.
11. Creating a simple password
If Local authentication has been implemented, Windows users must have a simple password in order to access network resources using their native protocol (CIFS).
However, if Domain authentication has been implemented for your server, a simple password is not required.
Instead, Domain authentication uses passthrough authentication to the Windows Domain Contoller
In our case, we are using local authentication and thus a simple password
This simple password is created with the Novell Cryptography Support module (NICI), which is included with Client 32
(You may need to install a more current version of the Novell Cryptography Support module (NICI). If so, do a keyword search on NICI from here)
From a workstation with client 32 loaded, run ConsoleOne located at: sys:\public\mgmt\ConsoleOne\1.2\bin\ConsoleOne.exe
(For improved speed, you can copy the contents of sys:\public\mgmt\ConsoleOne to your local hard disk)
Highlight the user object you wish to create a simple password, right click and select properties
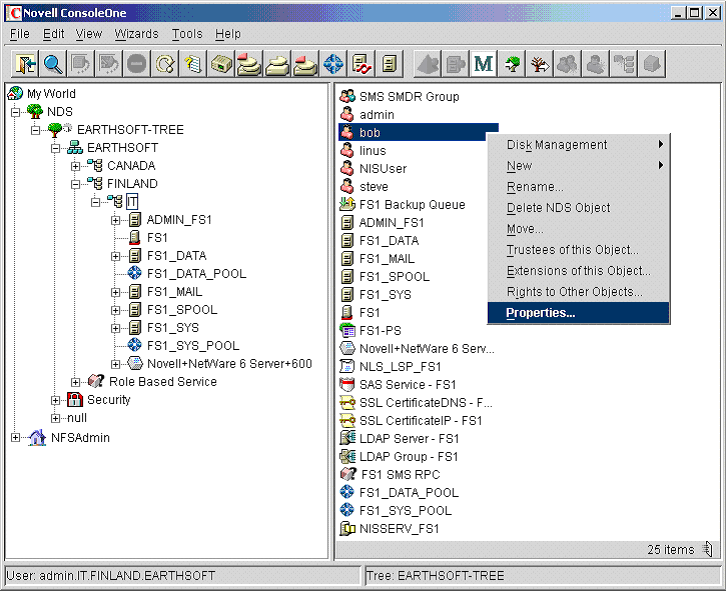
Now select the Login Methods tab and choose simple password from the drop down
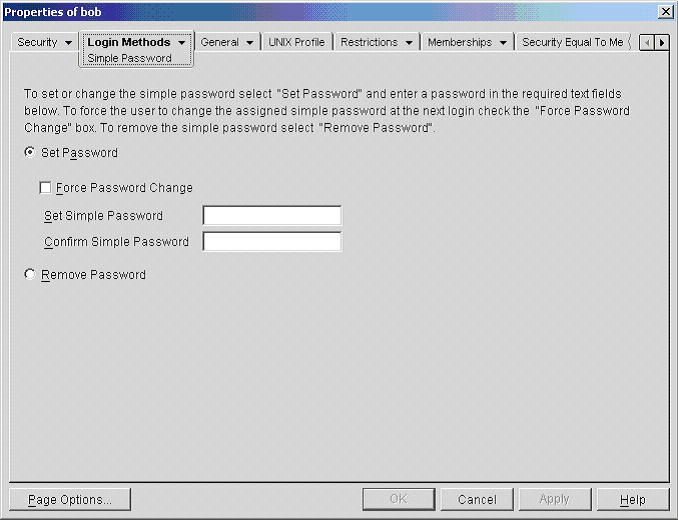
Enter and confirm the simple password.
That's it
12. Setting permissions on the shared directory
The last thing you need to ensure is the correct permissions are setup on the shared directory
Make sure the iR product's Universal Send's configured user name has the correct permissions to write to this directory
The user must have at least these permissions
Read
Write
Create
File Scan
13. Setting up the iR to push scan to the shared directoryI'd suggest testing if you can see and authenticate to this shared directory from Windows
Browse the network with network neighborhood, click the workgroup/domain you configured and the share name
Hopefully you can authenticate using the user name and simple password
Don't move on until you sort that out
Now from the iR, simply configure Universal Send with SMB and browse for the workgroup/domain and share
If you cannot authenticate ensure the iR's firmware is up to date
iR xx20 work great
Older i series cannot authenticate.
I've asked Cris to update ours but he's busy
More on that later
RETIRADO DE : http://isgsp.net.tripod.com/html/os/netware/push-netware-smb.html#6-2
EM: 03/12/2017
Assinar:
Postagens (Atom)