Pesquisar este blog

sexta-feira, 15 de novembro de 2019

Instalação do WINE no Mint

Installing WineHQ packages

Dialog-warning.svgThe WineHQ repository key was changed on 2018-12-19. If you downloaded and added the key before that time, you will need to download and add the new key and run sudo apt update to accept the repository changes.
Dialog-warning.svgBeginning with Wine 4.5, the wine-devel packages for Ubuntu 18.04 and 19.04 require libfaudio0 as a dependency. Since the distro does not provide it, libfaudio0 packages can be downloaded from the OBS. See https://forum.winehq.org/viewtopic.php?f=8&t=32192 for details
If you have previously installed a Wine package from another repository, please remove it and any packages that depend on it (e.g., wine-mono, wine-gecko, winetricks) before attempting to install the WineHQ packages, as they may cause dependency conflicts.
If your system is 64 bit, enable 32 bit architecture (if you haven't already):
sudo dpkg --add-architecture i386 
Download and add the repository key:
wget -nc https://dl.winehq.org/wine-builds/winehq.key
sudo apt-key add winehq.key
Add the repository:
For this version: Use this command:
Ubuntu 19.10 sudo apt-add-repository 'deb https://dl.winehq.org/wine-builds/ubuntu/ eoan main'
Ubuntu 19.04 sudo apt-add-repository 'deb https://dl.winehq.org/wine-builds/ubuntu/ disco main'
Ubuntu 18.04 Linux Mint 19.x
sudo apt-add-repository 'deb https://dl.winehq.org/wine-builds/ubuntu/ bionic main'
Ubuntu 16.04 Linux Mint 18.x
sudo apt-add-repository 'deb https://dl.winehq.org/wine-builds/ubuntu/ xenial main'
Update packages:
sudo apt update
Then install one of the following packages:
Stable branch
sudo apt install --install-recommends winehq-stable
Development branch
sudo apt install --install-recommends winehq-devel
Staging branch
sudo apt install --install-recommends winehq-staging
If apt complains about missing dependencies, install them, then repeat the last two steps (update and install).

If you have previously used the distro packages, you will notice some differences in the WineHQ ones:

  • Files are installed to /opt/wine-devel, opt/wine-stable, or /opt/wine-staging (depending on which version you installed).
  • Menu items are not created for Wine's builtin programs (winecfg, etc.), and if you are upgrading from a distro package that had added them, they will be removed. You can recreate them yourself using your menu editor.
  • Binfmt_misc registration is not added. Consult your distro's documentation for update-binfmts if you wish to do this manually.
  • WineHQ does not at present package wine-gecko or wine-mono. When creating a new wine prefix, you will be asked if you want to download those components. For best compatibility, it is recommended to click Yes here. If the download doesn't work for you, please follow the instructions on the Gecko and Mono wiki pages to install them manually.

Installing without Internet

To install Wine on an Ubuntu machine without internet access, you must have access to a second Ubuntu machine (or VM) with an internet connection to download the Wine .deb package and its dependencies.
The procedure goes like this: On the machine with internet, add the WineHQ PPA, then cache just the necessary packages without actually extracting them:
sudo add-apt-repository ppa:wine/wine-builds
sudo apt-get update
Then cache just the packages necessary for installing wine, without extracting them:
sudo apt-get clean
sudo apt-get --download-only install winehq-devel
sudo apt-get --download-only dist-upgrade
Copy all of the .deb files in /var/cache/apt/archives to a USB stick:
cp -R /var/cache/apt/archives/ /media/usb-drive/deb-pkgs/
Finally, on the machine without internet, install all of the packages from the flash drive:
cd /media/usb-drive/deb-pkgs
sudo dpkg -i *.deb
The same instructions can also be used for an offline installation of the `winehq-staging` packages.

Compiling WoW64

Ubuntu's implementation of Multiarch is still incomplete, so for now you can't simply install 32-bit and 64-bit libraries alongside each other. If you're on a 64-bit system, you'll have to create an isolated environment for installing and building with 32-bit dependencies. See Building Biarch Wine On Ubuntu for detailed instructions for Ubuntu using LXC, and Building Wine for general information. 


Fonte: https://wiki.winehq.org/Ubuntu
 

quinta-feira, 14 de novembro de 2019

Como deixar o Linux Mint com o visual do Windows 10 (Cinnamon)

Office no Linux (A maneira mais fácil)

SCRIPTS DE INSTALAÇÃO - LINUX


## Removendo travas eventuais do apt ##
sudo rm /var/lib/dpkg/lock-frontend; sudo rm /var/cache/apt/archives/lock ;
## Adicionando/Confirmando arquitetura de 32 bits ##
sudo dpkg --add-architecture i386
## Atualizando o repositório ##
sudo apt update
## Adicionando repositórios do Lutris e do Wine##
sudo add-apt-repository ppa:lutris-team/lutris -y
wget -nc https://dl.winehq.org/wine-builds/winehq.key
sudo apt-key add winehq.key -y
sudo apt-add-repository 'deb https://dl.winehq.org/wine-builds/ubuntu/ bionic main'
## Atualizando o repositório depois da adição de novos repositórios ##
sudo apt update
## Instalação do Lutris, Wine e adicionais para Battle.net ##
sudo apt install lutris libvulkan1 libvulkan1:i386 -y
sudo apt-get install --install-recommends winehq-stable wine-stable wine-stable-i386 wine-stable-amd64 -y
sudo apt-get install libgnutls30:i386 libldap-2.4-2:i386 libgpg-error0:i386 libxml2:i386 libasound2-plugins:i386 libsdl2-2.0-0:i386 libfreetype6:i386 libdbus-1-3:i386 libsqlite3-0:i386 -y
echo "Script Finalizado"
#!/bin/bash


#!/usr/bin/env bash
# ----------------------------- VARIÁVEIS ----------------------------- #
PPA_LIBRATBAG="ppa:libratbag-piper/piper-libratbag-git"
PPA_LUTRIS="ppa:lutris-team/lutris"
PPA_GRAPHICS_DRIVERS="ppa:graphics-drivers/ppa"
URL_WINE_KEY="https://dl.winehq.org/wine-builds/winehq.key"
URL_PPA_WINE="https://dl.winehq.org/wine-builds/ubuntu/"
URL_GOOGLE_CHROME="https://dl.google.com/linux/direct/google-chrome-stable_current_amd64.deb"
URL_SIMPLE_NOTE="https://github.com/Automattic/simplenote-electron/releases/download/v1.8.0/Simplenote-linux-1.8.0-amd64.deb"
URL_4K_VIDEO_DOWNLOADER="https://dl.4kdownload.com/app/4kvideodownloader_4.9.2-1_amd64.deb"
URL_INSYNC="https://d2t3ff60b2tol4.cloudfront.net/builds/insync_3.0.20.40428-bionic_amd64.deb"
DIRETORIO_DOWNLOADS="$HOME/Downloads/programas"
PROGRAMAS_PARA_INSTALAR=(
snapd
mint-meta-codecs
winff
guvcview
virtualbox
flameshot
nemo-dropbox
steam-installer
steam-devices
steam:i386
ratbagd
piper
lutris
libvulkan1
libvulkan1:i386
libgnutls30:i386
libldap-2.4-2:i386
libgpg-error0:i386
libxml2:i386
libasound2-plugins:i386
libsdl2-2.0-0:i386
libfreetype6:i386
libdbus-1-3:i386
libsqlite3-0:i386
)
# ---------------------------------------------------------------------- #
# ----------------------------- REQUISITOS ----------------------------- #
## Removendo travas eventuais do apt ##
sudo rm /var/lib/dpkg/lock-frontend
sudo rm /var/cache/apt/archives/lock
## Adicionando/Confirmando arquitetura de 32 bits ##
sudo dpkg --add-architecture i386
## Atualizando o repositório ##
sudo apt update -y
## Adicionando repositórios de terceiros e suporte a Snap (Driver Logitech, Lutris e Drivers Nvidia)##
sudo apt-add-repository "$PPA_LIBRATBAG" -y
sudo add-apt-repository "$PPA_LUTRIS" -y
sudo apt-add-repository "$PPA_GRAPHICS_DRIVERS" -y
wget -nc "$URL_WINE_KEY"
sudo apt-key add winehq.key
sudo apt-add-repository "deb $URL_PPA_WINE bionic main"
# ---------------------------------------------------------------------- #
# ----------------------------- EXECUÇÃO ----------------------------- #
## Atualizando o repositório depois da adição de novos repositórios ##
udo apt update -y
## Download e instalaçao de programas externos ##
mkdir "$DIRETORIO_DOWNLOADS"
wget -c "$URL_GOOGLE_CHROME" -P "$DIRETORIO_DOWNLOADS"
wget -c "$URL_SIMPLE_NOTE" -P "$DIRETORIO_DOWNLOADS"
wget -c "$URL_4K_VIDEO_DOWNLOADER" -P "$DIRETORIO_DOWNLOADS"
wget -c "$URL_INSYNC" -P "$DIRETORIO_DOWNLOADS"
## Instalando pacotes .deb baixados na sessão anterior ##
sudo dpkg -i $DIRETORIO_DOWNLOADS/*.deb
# Instalar programas no apt
for nome_do_programa in ${PROGRAMAS_PARA_INSTALAR[@]}; do
if ! dpkg -l | grep -q $nome_do_programa; then # Só instala se já não estiver instalado
apt install "$nome_do_programa" -y
else
echo "[INSTALADO] - $nome_do_programa"
fi
done
sudo apt install --install-recommends winehq-stable wine-stable wine-stable-i386 wine-stable-amd64 -y
## Instalando pacotes Flatpak ##
flatpak install flathub com.obsproject.Studio -y
## Instalando pacotes Snap ##
sudo snap install spotify
sudo snap install slack --classic
sudo snap install skype --classic
sudo snap install photogimp
# ---------------------------------------------------------------------- #
# ----------------------------- PÓS-INSTALAÇÃO ----------------------------- #
## Finalização, atualização e limpeza##
sudo apt update && sudo apt dist-upgrade -y
flatpak update
sudo apt autoclean
sudo apt autoremove -y


Referencia: https://www.youtube.com/watch?v=vBfj5dNZOSA
Autor: Diolinux

terça-feira, 12 de novembro de 2019

Conectar duas máquinas Linux e Windows com Samba.


1 - Criar uma conta no Windows com o mesmo nome e mesma senha(talvez) de uma conta no Linux (procure no google como criar, caso não saiba)
2 - Compartilhar a pasta ou unidade Windows e incluir o usuário Windows que você permitirá, e verificar permissões da rede e total:
clique com o botão direito em cima da pasta ou unidade e vá até propriedades e selecione compartilhar, no compartilhamento avançado(outra opção no mesmo menu) inclua o nome do usuário que receberá o acesso do Samba, ex.: marcos. Qualquer dúvida pesquise na internet como fazer isso.
3 - Instalar o Samba e o smbclient no Linux:
apt-get install samba smbclient
4 - Por comando vc deve utilizar o comando tipo esse exemplo, supondo que o ip da máquina Windows seja 10.1.1.3:
smbclient -L 10.1.1.3 -U marcos
5 - Criar um backup do smb.conf :
cd /etc/samba
mkdir backupsmb
cp smb.conf backupsmb/
mv backupsmb/smb.conf backupsmb/smb.conf.bkp
6 - Editar o smb.conf
vim /etc/samba/smb.conf
use essa como base, mas altere com seus nomes de usuário:
[global]
netbios name = linux
server string = Servidor público
workgroup = WORKGROUP
local master = yes
os level = 100
preferred master = yes
wins support = yes
map to guest = bad user
guest account = marcos

[arquivos]
path = /mnt
writable = yes
guest ok = yes

[backups]
path = /mnt
writable = yes
guest ok = yes
7 - Ao final o arquivo ficará mais ou menos assim, perceba que o global tá no meio do arquivo e os arquivos e backups estão no final: VEJA O CÓDIGO NO FINAL DESTE POST
8 - Crie um usuario samba no Linux, com a mesma senha (não necessariamente) do usuário que existe no sistema Linux e no Windows, e dê a permissão para a montagem:
smbpasswd -a marcos
chown -R marcos:marcos /mnt
9 - Pare e inicie o daemon do Samba:
/etc/init.d/samba stop
/etc/init.d/samba start
10 - Teste o samba, …:
testparm
11 - Configure a placa de rede no Windows:
  • clique com o botão direito no icone de rede no desktop, e depois em Alterar Configurações de Rede do Adaptador
  • clique com o botão direito em cima da placa de rede(se houver duas, desative a outra) e vá até propriedades
  • desative (desmarque o protocolo ipv6) e dê um duplo clique no ipv4, na janela que se abrirá, configure o ip da máquina, gateway e máscara, ex.:
ip - 10.1.1.3
gateway - 10.1.1.2
máscara - 255.0.0.0
  • aplique e salve, se for o caso, depois feche
  • desative e ative a conexão de rede, para pegar as configurações e aguarde o reconhecimento da mesma.
12 - Desative a placa de rede no Linux e reative com o ip e netmask correspondentes
ipconfig eth0 down
ipconfig eth0 10.1.1.2 netmask 255.0.0.0 up
obs.: Caso o icone da area de trabalho fique desconectado, desconsidere, confirme os dados com comando
ifconfig
Mais ou menos aparecerá:
eth0 Link encap:Ethernet Endereço de HW 00:87:56:9e:88:41 
 inet end.: 10.1.1.2 Bcast:10.255.255.255 Masc:255.0.0.0
 endereço inet6: fe80::221:97ff:fe6d:6450/64 Escopo:Link
 UP BROADCASTRUNNING MULTICAST MTU:1500 Métrica:1
 RX packets:107715 errors:0 dropped:0 overruns:0 frame:0
 TX packets:85580 errors:0 dropped:0 overruns:0 carrier:0
 colisões:0 txqueuelen:1000 
 RX bytes:126178753 (120.3 MiB) TX bytes:11810528 (11.2 MiB)
 IRQ:25 Endereço de E/S:0x6000 

lo Link encap:Loopback Local 
 inet end.: 127.0.0.1 Masc:255.0.0.0
 endereço inet6: ::1/128 Escopo:Máquina
 UP LOOPBACKRUNNING MTU:16436 Métrica:1
 RX packets:8159 errors:0 dropped:0 overruns:0 frame:0
 TX packets:8159 errors:0 dropped:0 overruns:0 carrier:0
 colisões:0 txqueuelen:0 
 RX bytes:726321 (709.2 KiB) TX bytes:726321 (709.2 KiB)
13 - Depois ping no ip da maquina do windows pra ver se está tudo normal:
ping 10.1.1.3 -c3
resultado, mais ou menos esse:
PING 10.1.1.3 (10.1.1.3) 56(84) bytes of data.
64 bytes from 10.1.1.3: icmp_req=1 ttl=128 time=0.169 ms
64 bytes from 10.1.1.3: icmp_req=2 ttl=128 time=5.03 ms
64 bytes from 10.1.1.3: icmp_req=3 ttl=128 time=0.168 ms

--- 10.1.1.3 ping statistics ---
3 packets transmitted, 3 received, 0% packet loss, time 2000ms
rtt min/avg/max/mdev = 0.168/1.791/5.037/2.295 ms
14 - Agora abra o Nautilus (uma pasta qualquer no modo gráfico), e aperte Ctrl+L, e na barra de endereços digite:
smb://10.1.1.3
pedirá usuario, grupo e senha. Preencha com marcos(o nome que vc escolheu), WORKGROUP e a senha do usuário.
pronto, vc acessará!

DADOS DO SMB.CONF:

#
# Sample configuration file for the Samba suite for Debian GNU/Linux.
#
#
# This is the main Samba configuration file. You should read the
# smb.conf(5) manual page in order to understand the options listed
# here. Samba has a huge number of configurable options most of which 
# are not shown in this example
#
# Some options that are often worth tuning have been included as
# commented-out examples in this file.
# - When such options are commented with ";", the proposed setting
# differs from the default Samba behaviour
# - When commented with "#", the proposed setting is the default
# behaviour of Samba but the option is considered important
# enough to be mentioned here
#
# NOTE: Whenever you modify this file you should run the command
# "testparm" to check that you have not made any basic syntactic 
# errors. 
# A well-established practice is to name the original file
# "smb.conf.master" and create the "real" config file with
# testparm -s smb.conf.master >smb.conf
# This minimizes the size of the really used smb.conf file
# which, according to the Samba Team, impacts performance
# However, use this with caution if your smb.conf file contains nested
# "include" statements. See Debian bug #483187 for a case
# where using a master file is not a good idea.
#

#======================= Global Settings =======================

[global]
netbios name = linux
server string = Servidor público
workgroup = WORKGROUP
local master = yes
os level = 100
preferred master = yes
wins support = yes
map to guest = bad user
guest account = marcos

#### Networking ####

# The specific set of interfaces / networks to bind to
# This can be either the interface name or an IP address/netmask;
# interface names are normally preferred
; interfaces = 127.0.0.0/8 eth0

# Only bind to the named interfaces and/or networks; you must use the
# 'interfaces' option above to use this.
# It is recommended that you enable this feature if your Samba machine is
# not protected by a firewall or is a firewall itself. However, this
# option cannot handle dynamic or non-broadcast interfaces correctly.
; bind interfaces only = yes


#### Debugging/Accounting ####

# This tells Samba to use a separate log file for each machine
# that connects
 log file = /var/log/samba/log.%m

# Cap the size of the individual log files (in KiB).
 max log size = 1000

# If you want Samba to only log through syslog then set the following
# parameter to 'yes'.
# syslog only = no

# We want Samba to log a minimum amount of information to syslog. Everything
# should go to /var/log/samba/log.{smbd,nmbd} instead. If you want to log
# through syslog you should set the following parameter to something higher.
 syslog = 0

# Do something sensible when Samba crashes: mail the admin a backtrace
 panic action = /usr/share/samba/panic-action %d


####### Authentication #######

# "security = user" is always a good idea. This will require a Unix account
# in this server for every user accessing the server. See
# /usr/share/doc/samba-doc/htmldocs/Samba3-HOWTO/ServerType.html
# in the samba-doc package for details.
# security = user

# You may wish to use password encryption. See the section on
# 'encrypt passwords' in the smb.conf(5) manpage before enabling.
 encrypt passwords = true

# If you are using encrypted passwords, Samba will need to know what
# password database type you are using. 
 passdb backend = tdbsam

 obey pam restrictions = yes

# This boolean parameter controls whether Samba attempts to sync the Unix
# password with the SMB password when the encrypted SMB password in the
# passdb is changed.
 unix password sync = yes

# For Unix password sync to work on a Debian GNU/Linux system, the following
# parameters must be set (thanks to Ian Kahan  for
# sending the correct chat script for the passwd program in Debian Sarge).
 passwd program = /usr/bin/passwd %u
 passwd chat = *Enter\snew\s*\spassword:* %n\n *Retype\snew\s*\spassword:* %n\n *password\supdated\ssuccessfully* .

# This boolean controls whether PAM will be used for password changes
# when requested by an SMB client instead of the program listed in
# 'passwd program'. The default is 'no'.
 pam password change = yes

########## Domains ###########

# Is this machine able to authenticate users. Both PDC and BDC
# must have this setting enabled. If you are the BDC you must
# change the 'domain master' setting to no
#
; domain logons = yes
#
# The following setting only takes effect if 'domain logons' is set
# It specifies the location of the user's profile directory
# from the client point of view)
# The following required a [profiles] share to be setup on the
# samba server (see below)
; logon path = \\%N\profiles\%U
# Another common choice is storing the profile in the user's home directory
# (this is Samba's default)
# logon path = \\%N\%U\profile

# The following setting only takes effect if 'domain logons' is set
# It specifies the location of a user's home directory (from the client
# point of view)
; logon drive = H:
# logon home = \\%N\%U

# The following setting only takes effect if 'domain logons' is set
# It specifies the script to run during logon. The script must be stored
# in the [netlogon] share
# NOTE: Must be store in 'DOS' file format convention
; logon script = logon.cmd

# This allows Unix users to be created on the domain controller via the SAMR
# RPC pipe. The example command creates a user account with a disabled Unix
# password; please adapt to your needs
; add user script = /usr/sbin/adduser --quiet --disabled-password --gecos "" %u

# This allows machine accounts to be created on the domain controller via the 
# SAMR RPC pipe. 
# The following assumes a "machines" group exists on the system
; add machine script = /usr/sbin/useradd -g machines -c "%u machine account" -d /var/lib/samba -s /bin/false %u

# This allows Unix groups to be created on the domain controller via the SAMR
# RPC pipe. 
; add group script = /usr/sbin/addgroup --force-badname %g

########## Printing ##########

# If you want to automatically load your printer list rather
# than setting them up individually then you'll need this
# load printers = yes

# lpr(ng) printing. You may wish to override the location of the
# printcap file
; printing = bsd
; printcap name = /etc/printcap

# CUPS printing. See also the cupsaddsmb(8) manpage in the
# cupsys-client package.
; printing = cups
; printcap name = cups

############ Misc ############

# Using the following line enables you to customise your configuration
# on a per machine basis. The %m gets replaced with the netbios name
# of the machine that is connecting
; include = /home/samba/etc/smb.conf.%m

# Most people will find that this option gives better performance.
# See smb.conf(5) and /usr/share/doc/samba-doc/htmldocs/Samba3-HOWTO/speed.html
# for details
# You may want to add the following on a Linux system:
# SO_RCVBUF=8192 SO_SNDBUF=8192
# socket options = TCP_NODELAY

# The following parameter is useful only if you have the linpopup package
# installed. The samba maintainer and the linpopup maintainer are
# working to ease installation and configuration of linpopup and samba.
; message command = /bin/sh -c '/usr/bin/linpopup "%f" "%m" %s; rm %s' &

# Domain Master specifies Samba to be the Domain Master Browser. If this
# machine will be configured as a BDC (a secondary logon server), you
# must set this to 'no'; otherwise, the default behavior is recommended.
# domain master = auto

# Some defaults for winbind (make sure you're not using the ranges
# for something else.)
; idmap uid = 10000-20000
; idmap gid = 10000-20000
; template shell = /bin/bash

# The following was the default behaviour in sarge,
# but samba upstream reverted the default because it might induce
# performance issues in large organizations.
# See Debian bug #368251 for some of the consequences of *not*
# having this setting and smb.conf(5) for details.
; winbind enum groups = yes
; winbind enum users = yes

# Setup usershare options to enable non-root users to share folders
# with the net usershare command.

# Maximum number of usershare. 0 (default) means that usershare is disabled.
; usershare max shares = 100

#======================= Share Definitions =======================

[homes]
 comment = Home Directories
 browseable = no

# By default, the home directories are exported read-only. Change the
# next parameter to 'no' if you want to be able to write to them.
 read only = yes

# File creation mask is set to 0700 for security reasons. If you want to
# create files with group=rw permissions, set next parameter to 0775.
 create mask = 0700

# Directory creation mask is set to 0700 for security reasons. If you want to
# create dirs. with group=rw permissions, set next parameter to 0775.
 directory mask = 0700

# By default, \\server\username shares can be connected to by anyone
# with access to the samba server.
# The following parameter makes sure that only "username" can connect
# to \\server\username
# This might need tweaking when using external authentication schemes
 valid users = %S

# Un-comment the following and create the netlogon directory for Domain Logons
# (you need to configure Samba to act as a domain controller too.)
;[netlogon]
; comment = Network Logon Service
; path = /home/samba/netlogon
; guest ok = yes
; read only = yes

# Un-comment the following and create the profiles directory to store
# users profiles (see the "logon path" option above)
# (you need to configure Samba to act as a domain controller too.)
# The path below should be writable by all users so that their
# profile directory may be created the first time they log on
;[profiles]
; comment = Users profiles
; path = /home/samba/profiles
; guest ok = no
; browseable = no
; create mask = 0600
; directory mask = 0700

[printers]
 comment = All Printers
 browseable = no
 path = /var/spool/samba
 printable = yes
 guest ok = no
 read only = yes
 create mask = 0700

# Windows clients look for this share name as a source of downloadable
# printer drivers
[print$]
 comment = Printer Drivers
 path = /var/lib/samba/printers
 browseable = yes
 read only = yes
 guest ok = no
# Uncomment to allow remote administration of Windows print drivers.
# You may need to replace 'lpadmin' with the name of the group your
# admin users are members of.
# Please note that you also need to set appropriate Unix permissions
# to the drivers directory for these users to have write rights in it
; write list = root, @lpadmin

# A sample share for sharing your CD-ROM with others.
;[cdrom]
; comment = Samba server's CD-ROM
; read only = yes
; locking = no
; path = /cdrom
; guest ok = yes

# The next two parameters show how to auto-mount a CD-ROM when the
# cdrom share is accesed. For this to work /etc/fstab must contain
# an entry like this:
#
# /dev/scd0 /cdrom iso9660 defaults,noauto,ro,user 0 0
#
# The CD-ROM gets unmounted automatically after the connection to the
#
# If you don't want to use auto-mounting/unmounting make sure the CD
# is mounted on /cdrom
#
; preexec = /bin/mount /cdrom
; postexec = /bin/umount /cdrom

[arquivos]
path = /mnt
writable = yes
guest ok = yes

[backups]
path = /mnt
writable = yes
guest ok = yes
Retirado de : https://terminalroot.com.br/2014/11/passo-passo-como-conectar-duas-maquinas.html

Autor : Marcos Oliveira

sexta-feira, 8 de novembro de 2019

Pfsense - Proxy Squid filtrando HTTPS

Fui uma grande surpresa minha, ao ver que no PFSense 2.3.1 foi criado um nova feature, que permite interceptar o tráfego HTTPs via squid, e ainda mais no modo transparente.


De fato, já funcionava antes, mas o processo para realizar essa função, além de trabalho, era bem complicado, com a geração do certificado, configuração do squid.conf, seja através do squid.inc ou das opções customizadas na Guia Geral do Squid.

Vou assumir que já esteja instalado o PFSense 2.3 e funcionando corretamente com sua LAN e WAN.

Por que habilitar HTTPS

Por default o squid não monitora e não pode monitorar tráfego criptografado HTTPS.

O  Squid simplesmente estabelece uma conexão TCP com o servidor de destino e responde ao cliente com uma resposta HTTP 200 para indicar que a conexão foi estabelecida.

Uma vez que o túnel criptografado tenha sido estabelecido, o squid passa os pacotes entre o cliente e o servidor, mas não tem nenhuma visibilidade para o tráfego, uma vez que é protegido por criptografia SSL.

E ao longo dos anos muitos sites começaram a ativar a criptografia HTTPS por padrão, como é o caso do google, gmail, facebook entre outros, tornando o monitoramento muito limitado, caso não fosse configuração interceptação proxy HTTPS.

Felizmente o squid suporta “man in the middle SSL Filter”, que permitirá visualizar o conteúdo que passa através do tráfego.

Apesar de suportar isso a algum tempo, sua configuração era no mínimo complicada, para não falar outra coisa. Mas na versão mais nova do PFSense esta tarefa se tornou tão simples como habilitar o próprio Squid.

Então vamos aos passos para habilitar essa funcionalidade no Squid.

Passo 1 – Instalar o Pacote Squid 3

O primeiro passo é instalarmos o Squid usando o Package Manager do PFSense, indo em System->Packages.
Após localizar o Squid3 da lista de pacotes click no botão mais “+” do lado direito do pacote para iniciar a instalação do pacote.
O package manager irá automaticamente fazer download e instalar o Squid 3.

squid_https-1

Instalando pacote Squid 3 do Gerenciador de Pacotes do PFSense
 
squid_https-2
Progresso de instalação do Pacote Squid3

Passo 2 – Configurações Gerais do Squid

Após a instalação do pacote Squid, as configurações gerais devem ser feitas. A página de configuração podem ser encontrada em Services \ Squid Proxy Server.
Configure as seguintes opções:
  1. Enable Squid Proxy – Checado
  2. Keep Settings/Data – Checado
  3. Proxy Interface(s) – Selecione LAN e Loopback.
O restante das configurações nesta guia Geral pode deixar como estão, o padrão.

squid_https-3
Página de Configuração do Squid3


Passo 3 – Configuração do Proxy Transparente

Logo abaixo das configurações Gerais, vamos encontrar as configurações de proxy transparente. Na maioria dos casos, você irá utilizar  o proxy transparente de forma que não seja necessário nenhuma configuração adicional nos browsers dos cliente. Quando ativamos o proxy transparente, o firewall redireciona automaticamente todo tráfego WEB (HTTP) para a entrada do servidor proxy.

Para habilitar o modo proxy transparente configure as seguinte opções:
  1. Transparent HTTP Proxy – Checado
  2. Transparent Proxy Interface(s) – LAN
o restante das configurações pode ficar padrão, a não ser que queira faze alguma configuração especifica como bypass para algum endereço externo ou interno.

Vá até o pé da página  e clique em save para salvar e aplicar as configurações feitas.

Se você não habilitar o modo transparente, terá que configurar o browser do cliente, e apontar as configurações de proxy para o IP do PFSense.

squid_https-4

Neste  ponto já temos o nosso proxy Squid configurado e pronto para uso no modo transparente. Já seria interessante testar nesse momento se está funcionado.

Passo 4 – Configurando Certificado de Autoridade (Certificate Authority)

Um certificado de autoridade deverá ser configurado no pfSense antes de habilitarmos a filtro HTTPS no Squid. A CA irá user usada para gerar novos certificados SSL para os clientes em termpo real e então criptografar e descriptografar o tráfego da web automaticamente.
  1. Acesso o gerenciado de certificado no menu System \ Cert Manager.
  2. Clique em “+” para criar um novo certificado de autoridade.
Configure os seguintes campos nos certificado:
  1. Descriptive Name: Escolha um nome para sua CA. Este nome será visível para os clientes.
  2. Method:  Selecione “Create an internal Certificate Authority” no menu dropdown.
  3. Key length: É recomendado 2048 para máxima compatibilidade, mas você pode usar 4096 bits para máxima segurança.
  4. Digest Algorithm – use SHA256 ou superior.
  5. LifeTime – Configure para 3650 dias (10 anos).
  6. Distinguished Name – Preencha todos os campos como Country, State, etc.
E posteriormente Salve.

squid_https-5

Passo 5 – Exportando o Certificado CA

Após a criação da nova CA, essa deve ser exportada. Este certificado irá deverá ser instalado em qualquer cliente que irá usar o proxy.
A partir do gerenciador de Certificados click em export CA para baixar o certificado, que salvara um arquivo com extensão .crt.


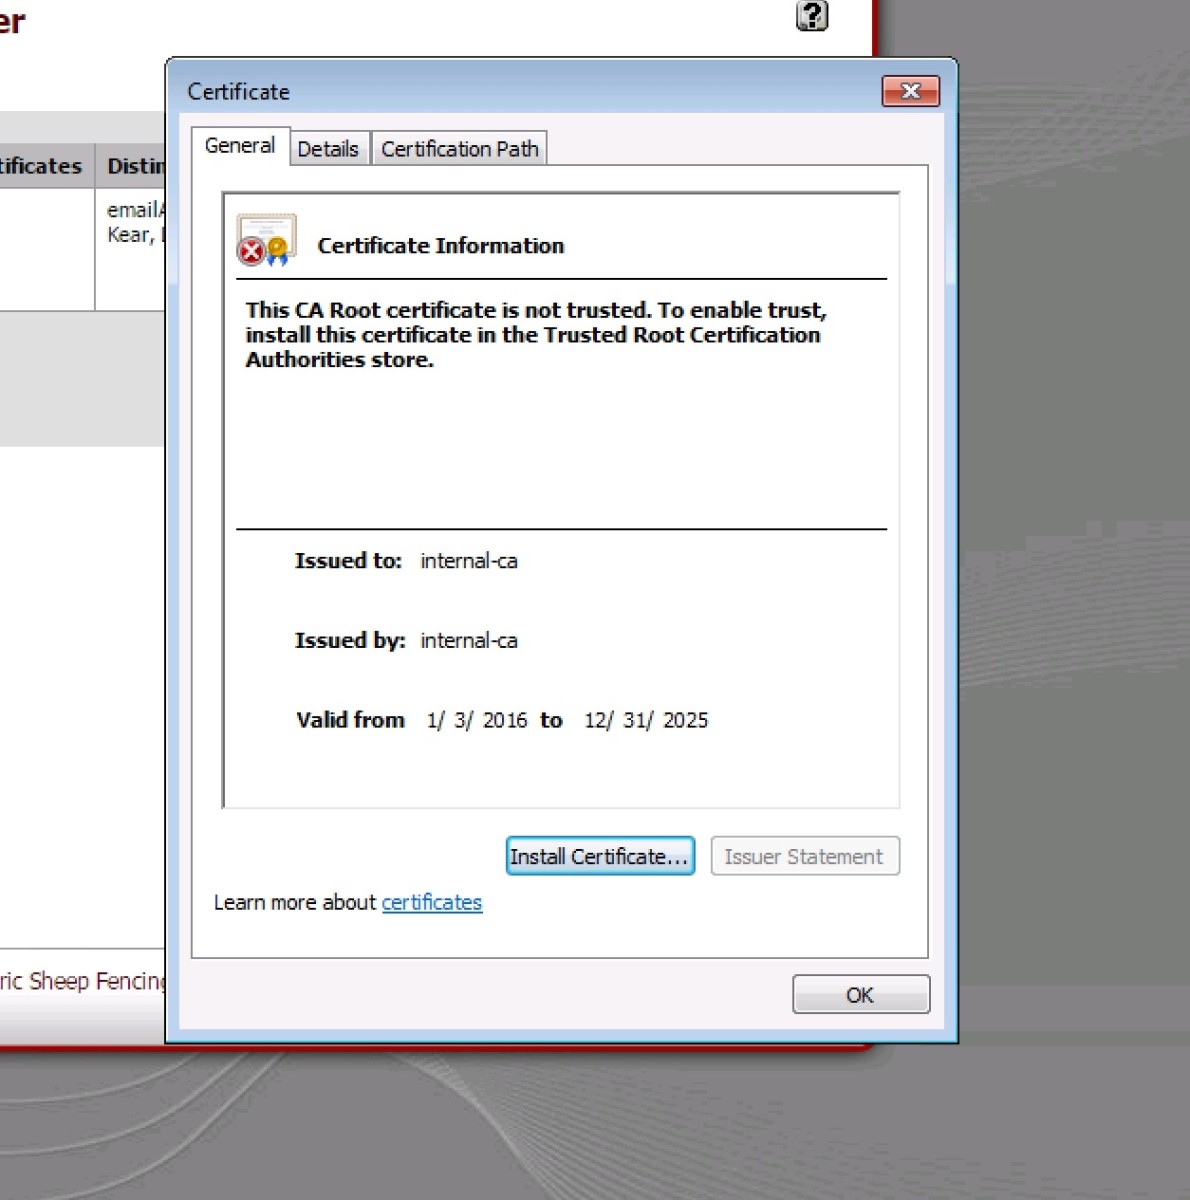
Passo 6 – Importando o Certificado

Para importar o certificado para um computador com Windows, clique duas vezes no arquivo .crt para abrir a caixa de diálogo do certificado.

Clique no botão de instalação de certificado para iniciar o assistente de importação.

Clique em Avançar na primeira página do assistente de importação de certificados.

Selecione a opção colocar todos os certificados no armazenamento a seguir.

Clique no botão procurar e selecione Autoridades de certificação raiz confiáveis.

Clique em próximo e clique em Concluir na página de confirmação de importação.

Quando solicitado, clique em sim para confirmar o aviso de segurança.

Você deverá ver uma mensagem indicando que a importação do certificado foi bem-sucedida.

Windows 7 certificate properties dialog

Passo 6 – Habilitando Filtro SSL em Man in The Middle

Depois de carregar o certificado nos computadores clientes, você estará pronto para ativar a filtragem de SSL no Squid.

Acesse a página de configurações do squid (Services \ Squid Proxy Server) e defina as configurações abaixo.

Interceptação HTTPS / SSL – Verificada
Interface (s) de Interceptação SSL – Selecione LAN

CA – Selecione a autoridade de certificação criada na etapa 4

Clique em salvar na parte inferior da página para aplicar as configurações.